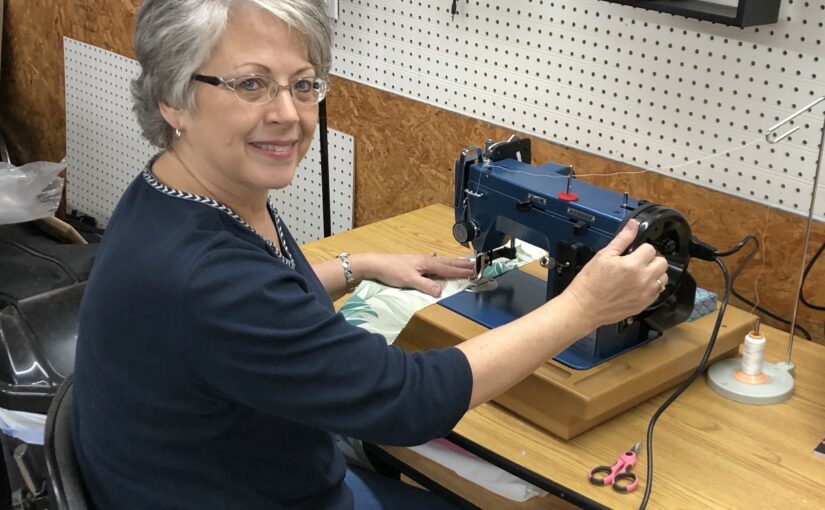
With a little help from Sailrite® and the Ultrafeed® Sewing Machine, Jan West felt like she could tackle just about any project. As an experienced sewist, she was no stranger to the world of DIY projects, and she was kind enough to share with us her most recent sewing successes. She is proof that there’s always a plethora of creative projects to create if you have just a little time, patience and determination.
Q: What’s your story? How’d you start sewing?
A: I started sewing when I was a young girl, probably 8 or 9 years old. Both of my grandmothers had a big impact on my love for sewing and crafting. I spent a lot of time with both of them, and they taught me to hand sew and allowed me to sew on their machines or work on crafts. As I grew older, my career and family didn’t allow me much time to sew, but recently, I’ve had free time again and gained inspiration to sew and work on different craft projects.
Q: What’s your most recent sewing accomplishment?
A: A few weeks ago, I decided to order fabric to re-cover my patio chair cushions. I had re-covered some a few years earlier and knew that I could tackle the job, but I wanted to refresh my memory by watching some YouTube videos. While watching these, I ran across the Sailrite video instructions on how to reupholster golf cart seats. The video was so easy to follow and understand and, knowing that I had sons that needed their seats reupholstered, I was convinced that I could do this.
I immediately started to search Sailrite’s website for the vinyl fabric that I would need. I was concerned that I didn’t have a walking foot upholstery sewing machine like Sailrite showed in their videos, but I did have an older metal machine with a walking foot. With the Sailrite video at my disposal, I was able to sew the vinyl on my old machine and the golf cart seats turned out very well.
At the same time, I knew that my stitching was not as perfect as it could have been due to having to coax the fabric through at times. Soon I realized that if I was going to continue these kinds of projects, I would need a Sailrite machine. It would take my next projects from looking good to looking great! Plus it would make the project so much easier to sew. By this time, I had already watched almost all of Sailrite’s videos and had convinced myself that I could re-cover an armchair, a bimini and much more.
I actually looked at different machines online, but after reading reviews, I always came back to the Sailrite website. I purchased the Ultrafeed LSZ and am currently sewing new covers for some wicker patio furniture. If you’re accustomed to a regular home sewing machine, it might take a little getting used to the walking foot on the Ultrafeed, but I have been very pleased with it so far. No more coaxing the fabric through the machine and no more inconsistent stitches! I can’t wait to reupholster the next golf cart seat. I have my Morbern® vinyl from Sailrite ready and waiting!

Q: Can you tell me a little bit more about your golf cart project?
A: My golf cart seat project went right along with your how-to video series. Luckily, the seats on my golf cart were exactly like the ones that you upholstered in your video. I started by removing the seat backs. I measured the lengths, widths and edges of them and also marked where I wanted the coordinating fabric to be centered on the backs. I used these measurements, along with the seat cushion measurements, to diagram out on paper how I would lay the pattern pieces out on 54-inch wide vinyl fabric. Then I decided how much fabric I would need to order from Sailrite.
I added a 1/2-inch seam allowance to all the measurements except the boxing pieces, marking the end boxing pieces as described in the video. Then I removed the staples holding the existing vinyl on and cut out the end boxing piece to be used as my pattern. With measurements from the plywood backing, I cut out the vinyl pieces for the front of the back cushion, including the coordinating fabric and allowed about 3 inches in length on each piece to wrap around and staple to the plywood back. I sewed the fabric strips together with a 1/2-inch seam and top stitched a flat-felled seam. I then stitched the boxing to each end and top stitched again, by watching your exceptional video.
My husband helped me by replacing the rusted tee nuts in the plywood and I used contact cement to reattach the foam to the plywood. I had purchased a pneumatic staple gun and my husband helped me to staple the vinyl to the plywood seat backs. I’m not very strong in my hands, so having someone to help you staple and stretch the vinyl is great. We attached the newly covered back cushions to the golf cart and transferred where I wanted the coordinating fabric to match up on the seat bottom and marked the old vinyl with a sharpie marker. I basically did the same process with the seat cushion as with the backs.
Overall, I enjoyed my experience with this project. It was much easier than I expected because of your instructional video tutorials that I kept referring to. The biggest setback was having to cut off the old screws and replace the tee nuts without damaging the plywood. Even though I used fabric from Sailrite, at this time I didn’t have my Ultrafeed and I really wish I did. It would’ve turned out much better.
Q: In your opinion, what’s the most rewarding part about sewing your own DIY projects?
A: I think that the most rewarding part of sewing my own projects is the self-satisfaction of knowing that you can accomplish something that you’ve never done before, along with saving the money that you would have paid someone else to do it for you. And I can use my talent to help save my family money too!
Now that I have the Sailrite machine, I am already using it to sew some new patio cushions. I am thrilled with it, and I can’t wait to finish this project and use the machine on the next golf cart seat waiting in the wings. I even have plans to re-cover an armchair when I decide on the fabric I want. I’ve been so inspired by your video tutorials and I truly believe: “I can do that!”
Please keep the videos coming!

Who We Are
Sailrite is your one-stop DIY shop! We are a passionate crew of do-it-yourselfers who strive to equip you with the supplies and how-to knowledge you need to tackle your next project. Do you want to learn upholstery, leatherwork, canvaswork, hobby sewing, bag making or more? We have the fabric, tools, hardware, sewing machines and notions you need to master any DIY. And even if you’ve never sewn before, our tutorials and how-to videos are designed for beginners and experienced crafters alike.
Start your DIY journey today: www.sailrite.com
Well done – it does give you a great sense of achievement when you complete this type of task.
Good Job. Jan you really did a good congratulations they look beautiful . Its fun to work on different upholstery jobs. G B U
Do you have to buy an expensive machine to sew patchwork for upholstery which I have taken up since retiring
Hi Betty,
Home sewing machines should be able to handle upholstery if the fabric is lightweight. The seams might be a little difficult. Most upholsterers prefer a heavy-duty machine with a walking foot to make upholstery work easy and enjoyable.
Good going Jan,, your work looked good ! I’ve been doing all types of reupholstery for 55 years !
Jack in Tennessee
Encouraging and motivating. I have always loved to watch the videos on Sailrite. Although I’ve done very few of the projects, the videos are so clear And seemingly easy to follow, I think I could accomplish MOST of the projects. All I need is to purchase the Ultrafeed!
Beautiful job! Thanks you for sharing your story. It encourages me to tackle tome projects of my own.
Jan I completely agree with you on the videos. They are so detailed and interesting to watch. After watching one, that ‘can do’ attitude just happens! I love your work on the golf cart and cushions. Loved your story. Blessings on your next projects. Kathy
Your seat re-cover turned out great.
Really inspiring. Yes, the tutorials are truly outstanding and have made me wish to do more projects. I covered some bench cushions using a tutorial. I’m sure it would have been somewhat easier and more “professional” looking had I had one of your sewing machines. Just can’t quite justify the expense right now.
How wonderful that you tackled these projects.
The results are beautiful!
Amazing work and a terrific story. Thank you for sharing. I saw an old Read’s machine in a marine consignment shop a few weeks ago and it got me wanting a heavy-duty machine to create and mend items on our small sailboat. These machines are impressive and my research has exposed many “clones” that are far less expensive, but I keep “finding my way back” here to Sairite…hoping for a sale!
How necessary is the Monster Wheel?
Thank you!
Hi Lisa,
Yes, the Read machines and the Ultrafeed machines competed for a few years until the Reads eventually disappeared. We actually talk about this (and how the Ultrafeed machines were designed to be more efficient and hardier) in our History of the Ultrafeed blog. https://www.sailrite.com/ultrafeed-history
The Monster® II Balance Wheel is handy if you want the option of hand cranking and sewing without electricity. It also promotes a smoother and quieter sewing experience.
Thank you for your reply! I just read the history and found it so interesting and informative. And, it makes me want one even more! (Don’t tell my husband!) I’ll be saving my money and waiting for a sale. I “hear tell” that maybe October? If any sales or promotions are coming up sooner, I’ll check them out. I am on the email list.
Thanks again. I LOVE the stories and the passion for the machine and the customers. My husband and I are owners of a very, very small ukulele shop in California and we know how it feels to have happy, satisfied customers.
We don’t have any sales planned for the foreseeable future, but being on our email list is the best way to stay informed and be the first to know!