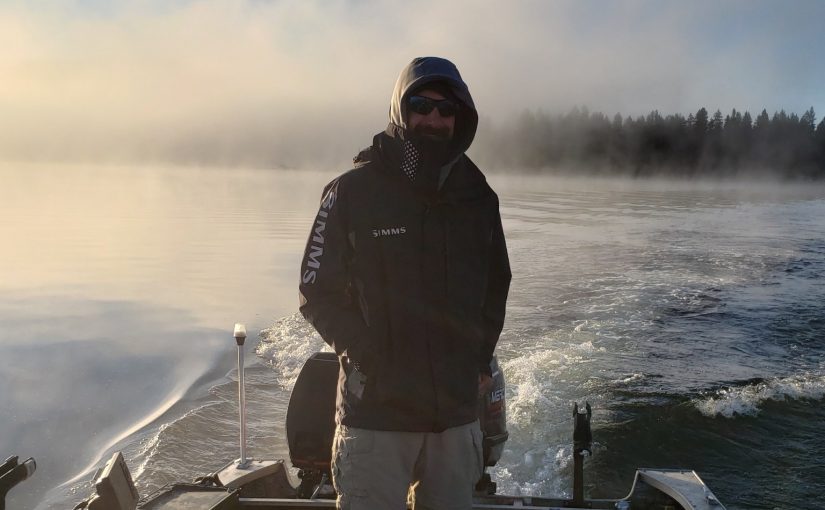
Sewing for yourself is rewarding enough, but sewing for others opens up a whole new realm of DIY possibilities. When Debbie Stitz saw that her son’s boat was in dire need of new seats before salmon season in their hometown, she knew just the person to reupholster them — herself! Backed by her extensive sewing knowledge and a few key tools and supplies from Sailrite®, she set out to completely transform her son’s boat. She was generous enough to share the story of her many ups and downs on the road to do-it-yourself success with us.
Q. Have you always loved to sew? When did you learn?
I learned to sew at a young age. I remember it well. My mother was never a sewer, but my Aunt Susie was. My first project was a skirt with shoulder straps that crossed in the back and buttoned in the front. I remember making it at my cousin’s house in Upstate New York with my aunt’s help. I was so proud when I finished the skirt. I wore it the next day and told everyone I made it myself.
From that day forward, I was hooked on sewing and determined to teach myself. I got a job working at a fabric store in my hometown of Corning, New York, and made most of my own clothes in high school. I taught myself to read and follow patterns, put in sleeves and sew in zippers. I just loved the creativity of being able to design and make my own clothes.
Q. How did you come across Sailrite? What made you choose the Ultrafeed® LSZ?
I started on a Kenmore machine, but tension problems and motor speeds convinced me to invest in a Bernina as I started to venture into curtains, home décor and quilting. There is nothing more frustrating than sewing with a machine that cannot do the job and give you professional-looking results.

I then started doing small upholstery projects and cushions, but my Bernina machine was having a tough time with the heavier fabrics and achieving a professional-looking stitch with heavier threads. I needed a commercial machine but could never justify the high cost for one. I was surfing the web one day and found the Sailrite® site. When I read about the features of the Ultrafeed LSZ and the price point, I was ecstatic and ordered one. I chose the LSZ model because I wanted the zigzag feature.
Q. So you used the Ultrafeed to remodel boat seats? How did that happen?
At that time, my oldest son had asked me if I could make new vinyl berth cushions for his boat. Not only did I discover the Ultrafeed LSZ machine at Sailrite, but all the choices of marine vinyl, V-69 threads, needles, zippers, foam, cushion wrap silk film, cording, 1/4-inch basting tape — everything I needed to make his new V-berth cushions. I had made cushions before with fabrics, but sewing with vinyl was a new challenge for me. Sailrite offered wonderful videos that guided me in purchasing the right vinyl for my project and how to make my own cording and cushions.

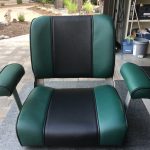
Together, my son and I chose Morbern® Seabrook Sea White vinyl. I also purchased the Flex20 LED light, Deluxe 5 ½ Magnetic Sewing Guide. And for my new LSZ Machine, I chose the Right Roping Zipper Foot, Cording Foot Set and 1” Swing-Away Binder. The tutorials for learning the LSZ machine were extremely well done and very helpful to get started. I was convinced that this machine was a powerhouse and sewed anything I asked it to!
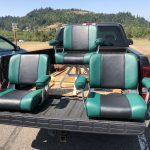
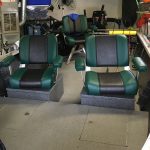
My confidence was soaring when my youngest son asked if I could re-cover his torn and tattered boat seats in his newly purchased used fishing boat. Of course, I said yes. After removing the tattered vinyl from the seats to try and get some sense of a pattern, I soon realized that all three of the seats needed to be totally rebuilt. The wood and foam were so rotten, and the screws so rusted, that it took my husband and I a full day to get the seats apart! We thought about just buying him new seats, but these were Bentley seats at $400 each that were just not taken care of. We decided these seats were worth restoring and took on the challenge together, as a team.
My husband ordered the marine plywood, stainless steel machine screws, 4-prong hex nuts and supplies to build the seat structures. I went directly to the Sailrite site, where I found all the fabric and supplies needed to construct the new seat covers. I basically followed the original pattern of how the old covers were made, and my son’s choice was two colors of Naugahyde® vinyl that I got from Sailrite.
Q. Can you explain your DIY process a bit more?
Making and marking the pattern pieces were the most important. I took the least tattered pieces of the old covers and trimmed them where the original stitching holes were. I drew them out on poster board and added 1/2-inch seam allowances on all sewing sides. I marked the center points on the corners, and all other areas, to ensure a good match when sewing together. I then transferred and traced the pattern and markings to the Naugahyde fabric back, being sure to flip the pattern and mark for left and right sides, top and bottom, etc. I made all the contrasting cording first and machine basted to the seat pieces and then sewed the pieces together. I absolutely love my Ultrafeed LSZ machine! It sewed through the layers of Naugahyde with ease and the topstitching looked so professional. The Cording Foot Set also helps to make your own cording a breeze and is actually my favorite step.
The next step was to remove the bad foam and replace with new foam after my husband had finished the wood seats and arms. Even though we used marine plywood, I still put 3 coats of Varathane® on the wood to keep it moisture and water-repellent. I used an electric kitchen knife to form and shape the foam and then used contact cement to glue the foam to the newly made wood seats. I lightly sprayed foam adhesive to the foam and covered the foam with Cushion Wrap Silk Film. The small amounts of adhesive spray kept the silk wrap from shifting as I was putting the new covers over the foam.
Using an electric staple gun and stainless steel staples (no rust), I attached the covers over the foam for the final fit. It was a two-person effort with my husband pulling and me stapling! I then attached the Hidem Gimp purchased from Sailrite to the bottom of the seatbacks to hide the staples. There were some hiccups along the way, but nothing too serious. It took a lot of “thinking and planning” before “cutting and sewing.”
Q. Sounds like quite the project. What was the reaction of your family/friends to the finished product?
The end result was three new boat seats that looked so professionally made. My husband and I were so proud to have accomplished something that we had never done before. It was a team effort. He was the carpenter and I did the sewing. Family and friends were amazed by the professional look of our final project, and our son was so thrilled to have new boat seats for the start of salmon season here in Oregon! I am hooked more now than ever, not on catching salmon, but hooked on sewing and starting my next project with my Sailrite Ultrafeed LSZ! New patio cushions and pillows are next.

Thank you, Sailrite, for the machine, the accessories, the fabrics and all the inspirational videos you so thoughtfully put together on your website to inspire us all!
Who We Are
Sailrite is your one-stop DIY shop! We are a passionate crew of do-it-yourselfers who strive to equip you with the supplies and how-to knowledge you need to tackle your next project. Do you want to learn upholstery, leatherwork, canvaswork, hobby sewing, bag making or more? We have the fabric, tools, hardware, sewing machines and notions you need to master any DIY. And even if you’ve never sewn before, our tutorials and how-to videos are designed for beginners and experienced crafters alike.
Start your DIY journey today: www.sailrite.com
Superb work, well done.
Perfect! Thank you for sharing all the steps and photos, I’m so inspired, beautiful professional job. Congrats!
Beautiful end product! I purchased the Salirite LSZ1 model as well and I just finished my first project with it. I made fabric seat cushions for our camper, new curtains, and new foam bed covers. The machine is a dream to work with. You have inspired me to tackle a new seat cover for my husband’s old Chevy pick up truck. Thank you!
I want to see a video in that one. I’ve been tempted , & haven’t yet reupholstered a truck or car seat.
Wow! I am awestruck. Thanks for sharing all the details too.
Very nice job you should be proud of it. I still remember my first boat .
I am so impressed with your work and feel inspired by your story.
You better get all the salmon you can eat!
Fantastic work! They look great.
Beautiful job! Your story is mine exactly. My love of sewing began with Home Ec class, then my very 1st sewing machine for my 16th Birthday. which was a Kenmore in 1969. I have been sewing and creating ever since. I love Sailrite and all their products. My latest project was
6 sling chairs.
Great job very professional
Absolutely great work. They look as professional as they could possibly be.
IMPRESSIVE! Have reupholstered the seats of 3 boats & learned SO much from your tutorial. I hadn’t met Sailrite when redoing hubbies & friends. Thank you!!!
Wow, what great-looking seats! But it would be a shame for them to get baked by the sun when the boat isn’t in use. The next project should be some sun covers to toss over them when nobody is aboard. It would keep those handsome seats looking new for a long time.
My Son stores his boat in his garage. I offered to make covers . ?
DEBBIE, YOU ROCK!
I wish I could work along side your next project to learn from you?
Thanks for sharing!
I am so impressed with this story I read it through twice. Can’t stop looking at those pictures of the new coverings.
Go Ducks!
Great job!!! Potential for a new career!
I am very impressed with your work on your son’s boat! I am about to start my brother’s seats from his pontoon boat. I’ve done furniture upholstery but never a boat. You inspired me to take on the project!
Thanks for sharing.