Welcome to Sailrite’s "Meet Our Customers” page where we feature fascinating interviews and interest pieces submitted by our customers. This page enables us to spotlight our loyal and creative customers and tell their stories. From tales of complete canvas refits to testimonials about how Sailrite products and services have greatly enhanced and improved their DIY lifestyles, these stories are sure to inspire you as much as they inspire us.
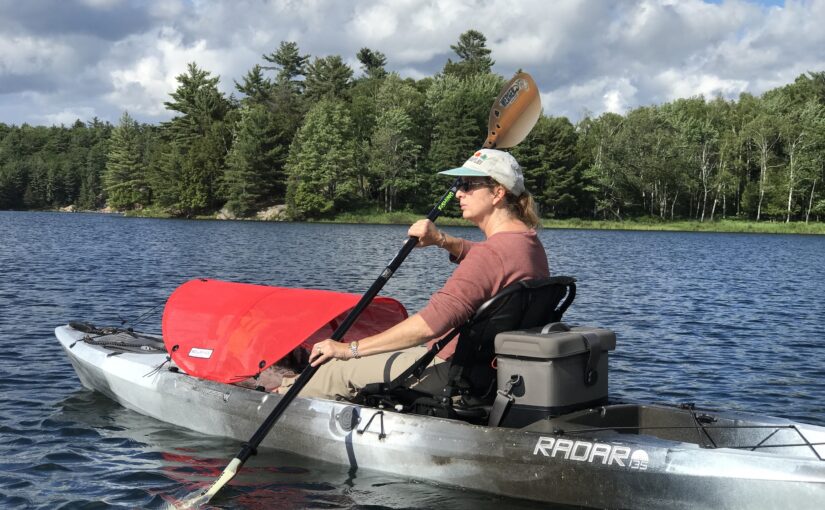
Wayne Edney is no stranger to hard work, patience and the spirit of self-reliance that defines every DIYer. In 1994, he completed the build of a Bristol Channel Cutter 28 from a bare hull. He spent eight years building the boat on a teacher’s salary, devoting his weekends and summers to the project.
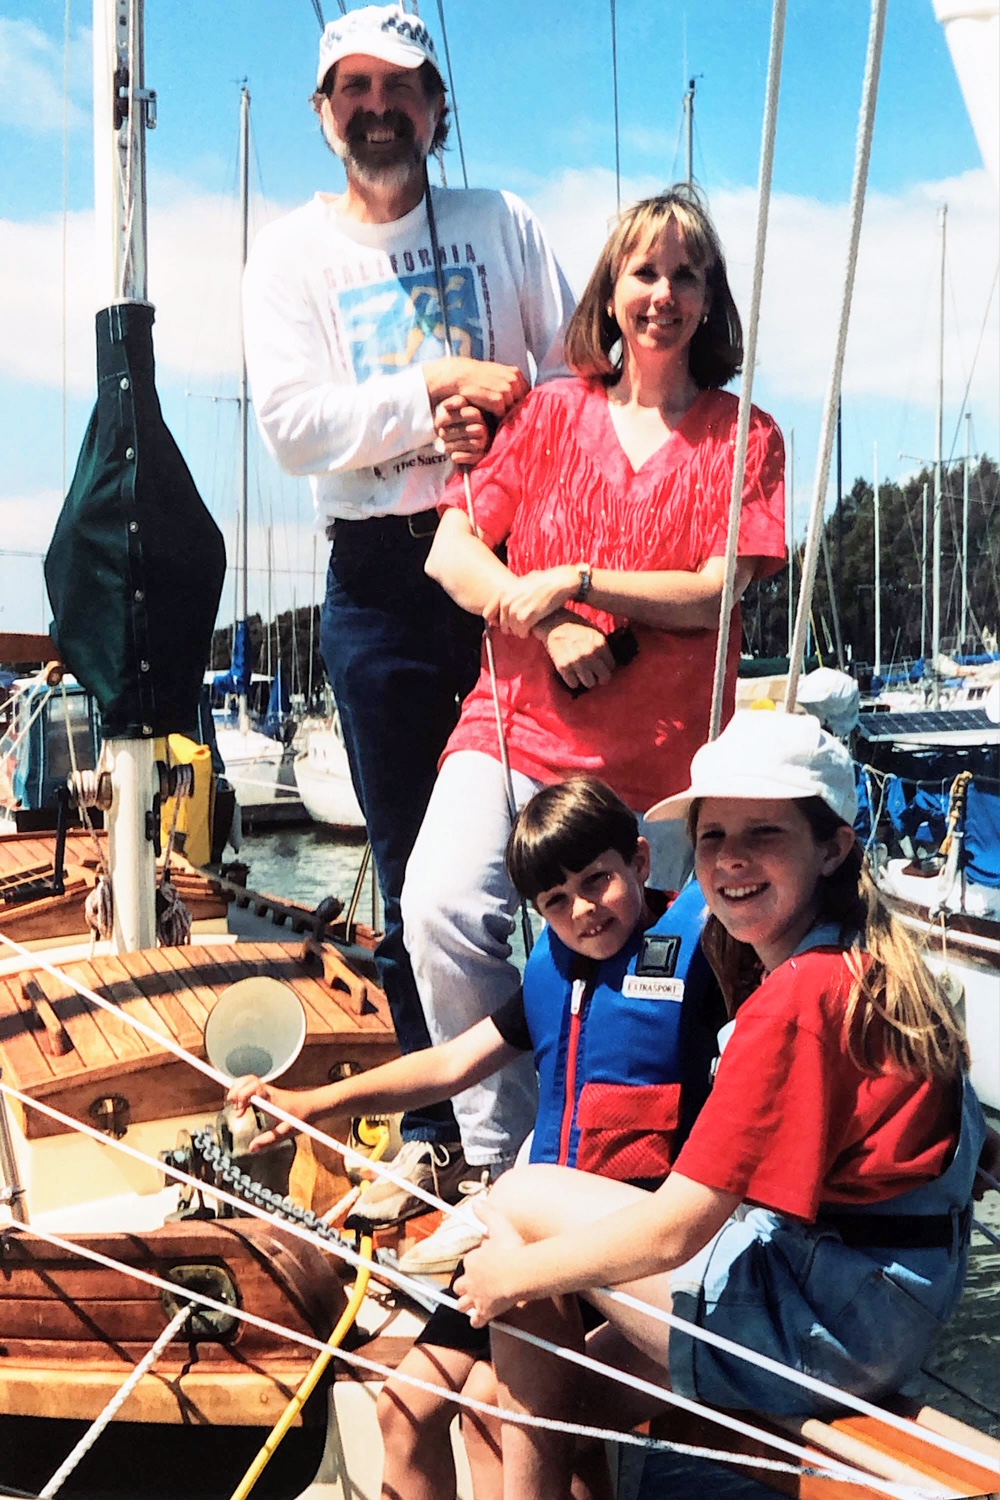
“This was the culmination of a dream that had first come to light 20 years earlier after reading a cruising book by Erik Hiscock,” Wayne shared with us. “It had been a 20-year odyssey to finally launch my own cruising boat, so the boat was christened ‘Odyssey’ by my wife, Karen, and our two children, Annalise (11 years) and Erik (7 years).”
The Edney family on launch day of “Odyssey.”
The yearslong build marked the start of an incredible adventure for the teacher and his family. Keep reading to find out how Sailrite could help this intrepid DIYer fulfill his lifelong dream of building and launching a sailboat.
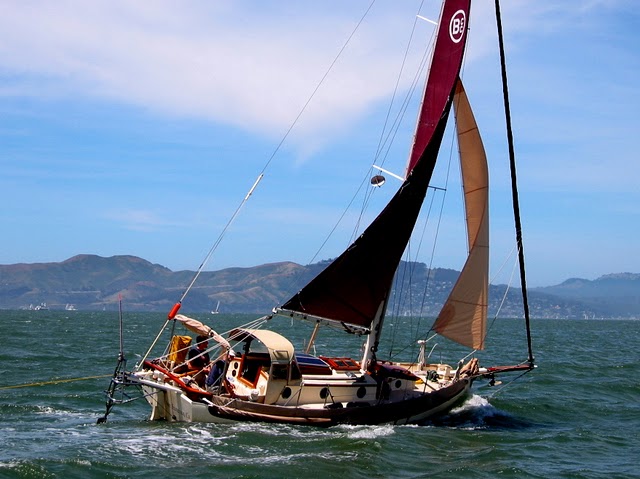
The Hull Truth
The Bristol Channel Cutter Wayne ordered from the Sam L. Morse Company in 1986 was delivered to his house as a bare hull. Wayne eagerly got to work. “They say that you can learn a lot by reading and I read every boatbuilding book I could find. However, there is no substitute for experience. In 1981, I took a one year leave of absence from teaching to attend a yearlong apprentice program at the Landing Boat Shop in Kennebunkport, Maine. I helped build a Swampscott dory and a Buzzards Bay daysailor. The woodworking skills I learned there were invaluable for completing my boat.”
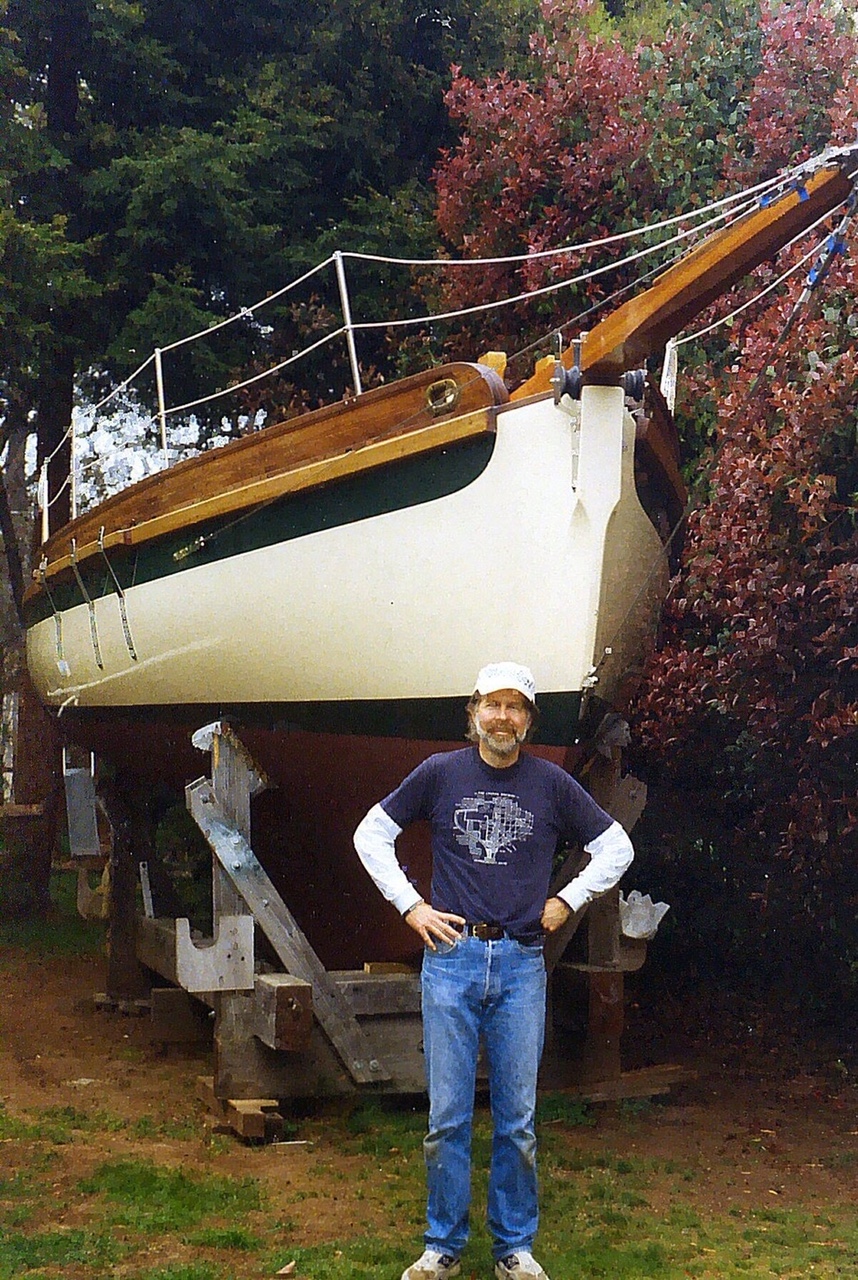
Throughout the eight-year build of “Odyssey,” Wayne learned many valuable lessons about patience and resourcefulness. “Obstacles can sometimes be blessings in disguise,” he told us. “Building a cruising boat on a teacher’s salary meant limited cash flow, so patience and making the most out of each piece of wood were valuable lessons learned. Looking at the interior of my finished boat, a friend once said, ‘I can’t believe that you built all of this!’ I can’t either, but as I look at each individual piece of wood, I can remember the care that went into forming it.”
Overcoming money challenges, every piece of wood became a part of the boat’s story — a story crafted with care and dedication.
Wayne stands proudly with the boat he built.
Setting Sail
Once Wayne put the finishing touches on the “Odyssey,” he was more than eager to enjoy the fruits of his labor. In 2002, he took another leave of absence from teaching. The family set sail on a six-month cruise to Mexico. “We traveled from San Francisco to Cabo San Lucas to the mainland of Mexico and up into the Sea of Cortez.” Today, San Francisco Bay is their sailing playground, with week-long trips to the delta regions of Stockton and Sacramento.
Wayne learned to sail at the University of California, Davis. He enrolled in a sailing course for his physical education credit. “The course was taught on Sunfish boats. They were really small. When you made a mistake, you ended up in the cold water and were not likely to repeat that mistake.”
What began as a college course evolved into a lifelong love of sailing and the open sea. “Being close to nature and self-sufficiency are two of the greatest things about sailing and being on the water. Most people can remember the first time they came close to the sea and smelled the ocean even before they saw it. Sailing along beautiful shorelines, you are at home with the birds and animals living there.
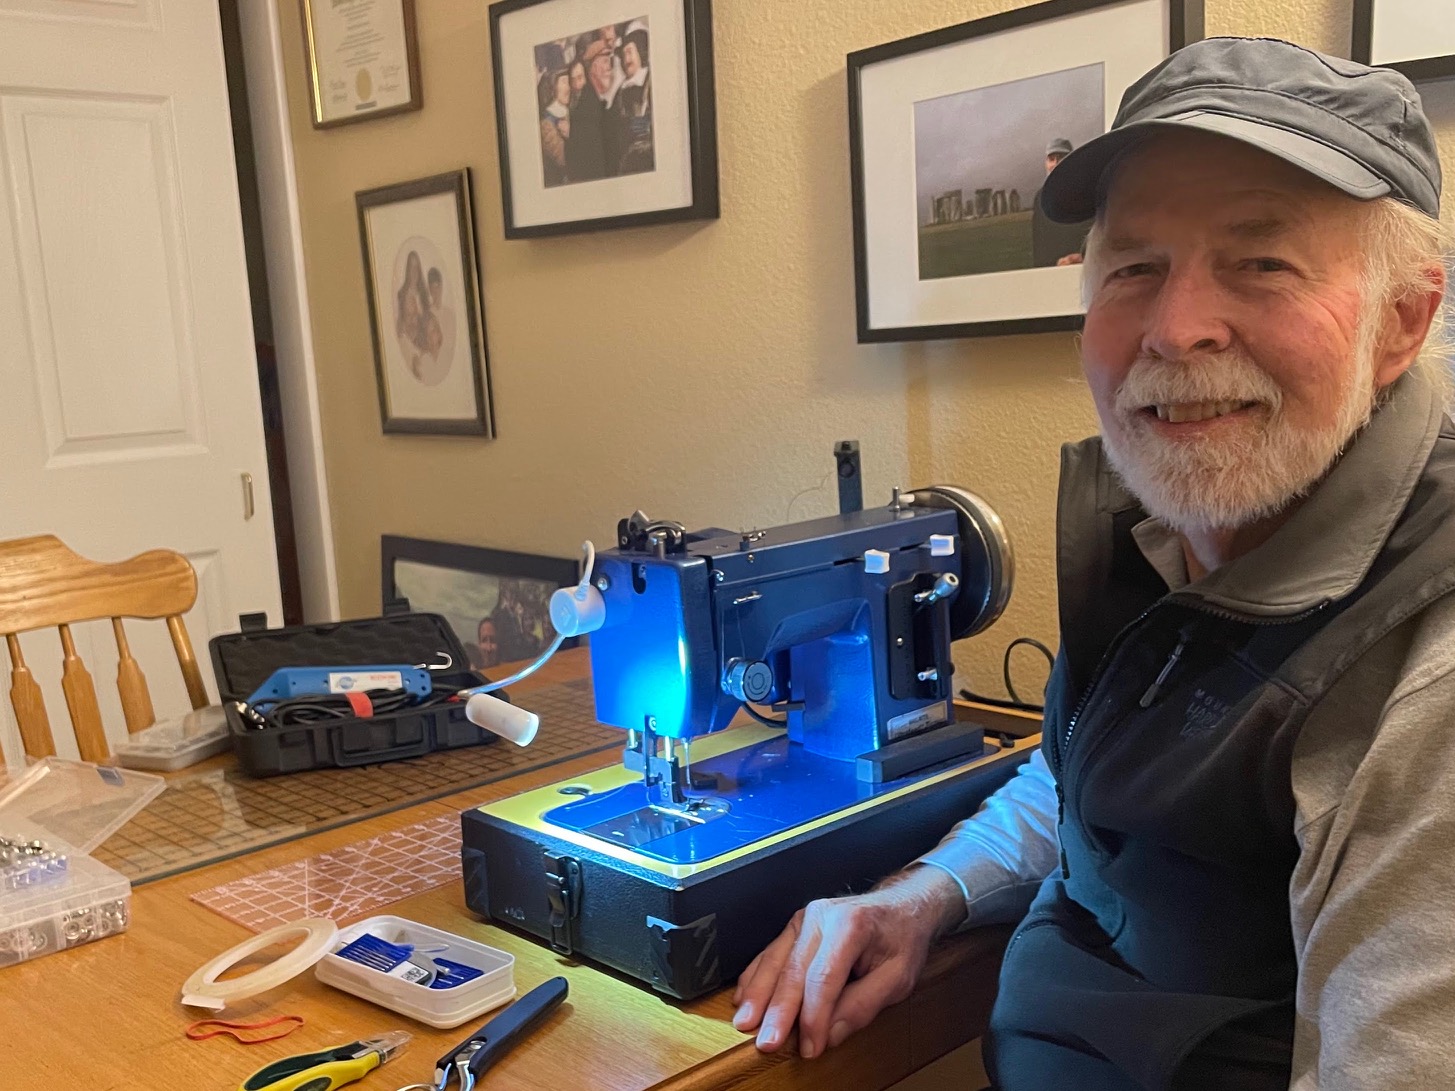
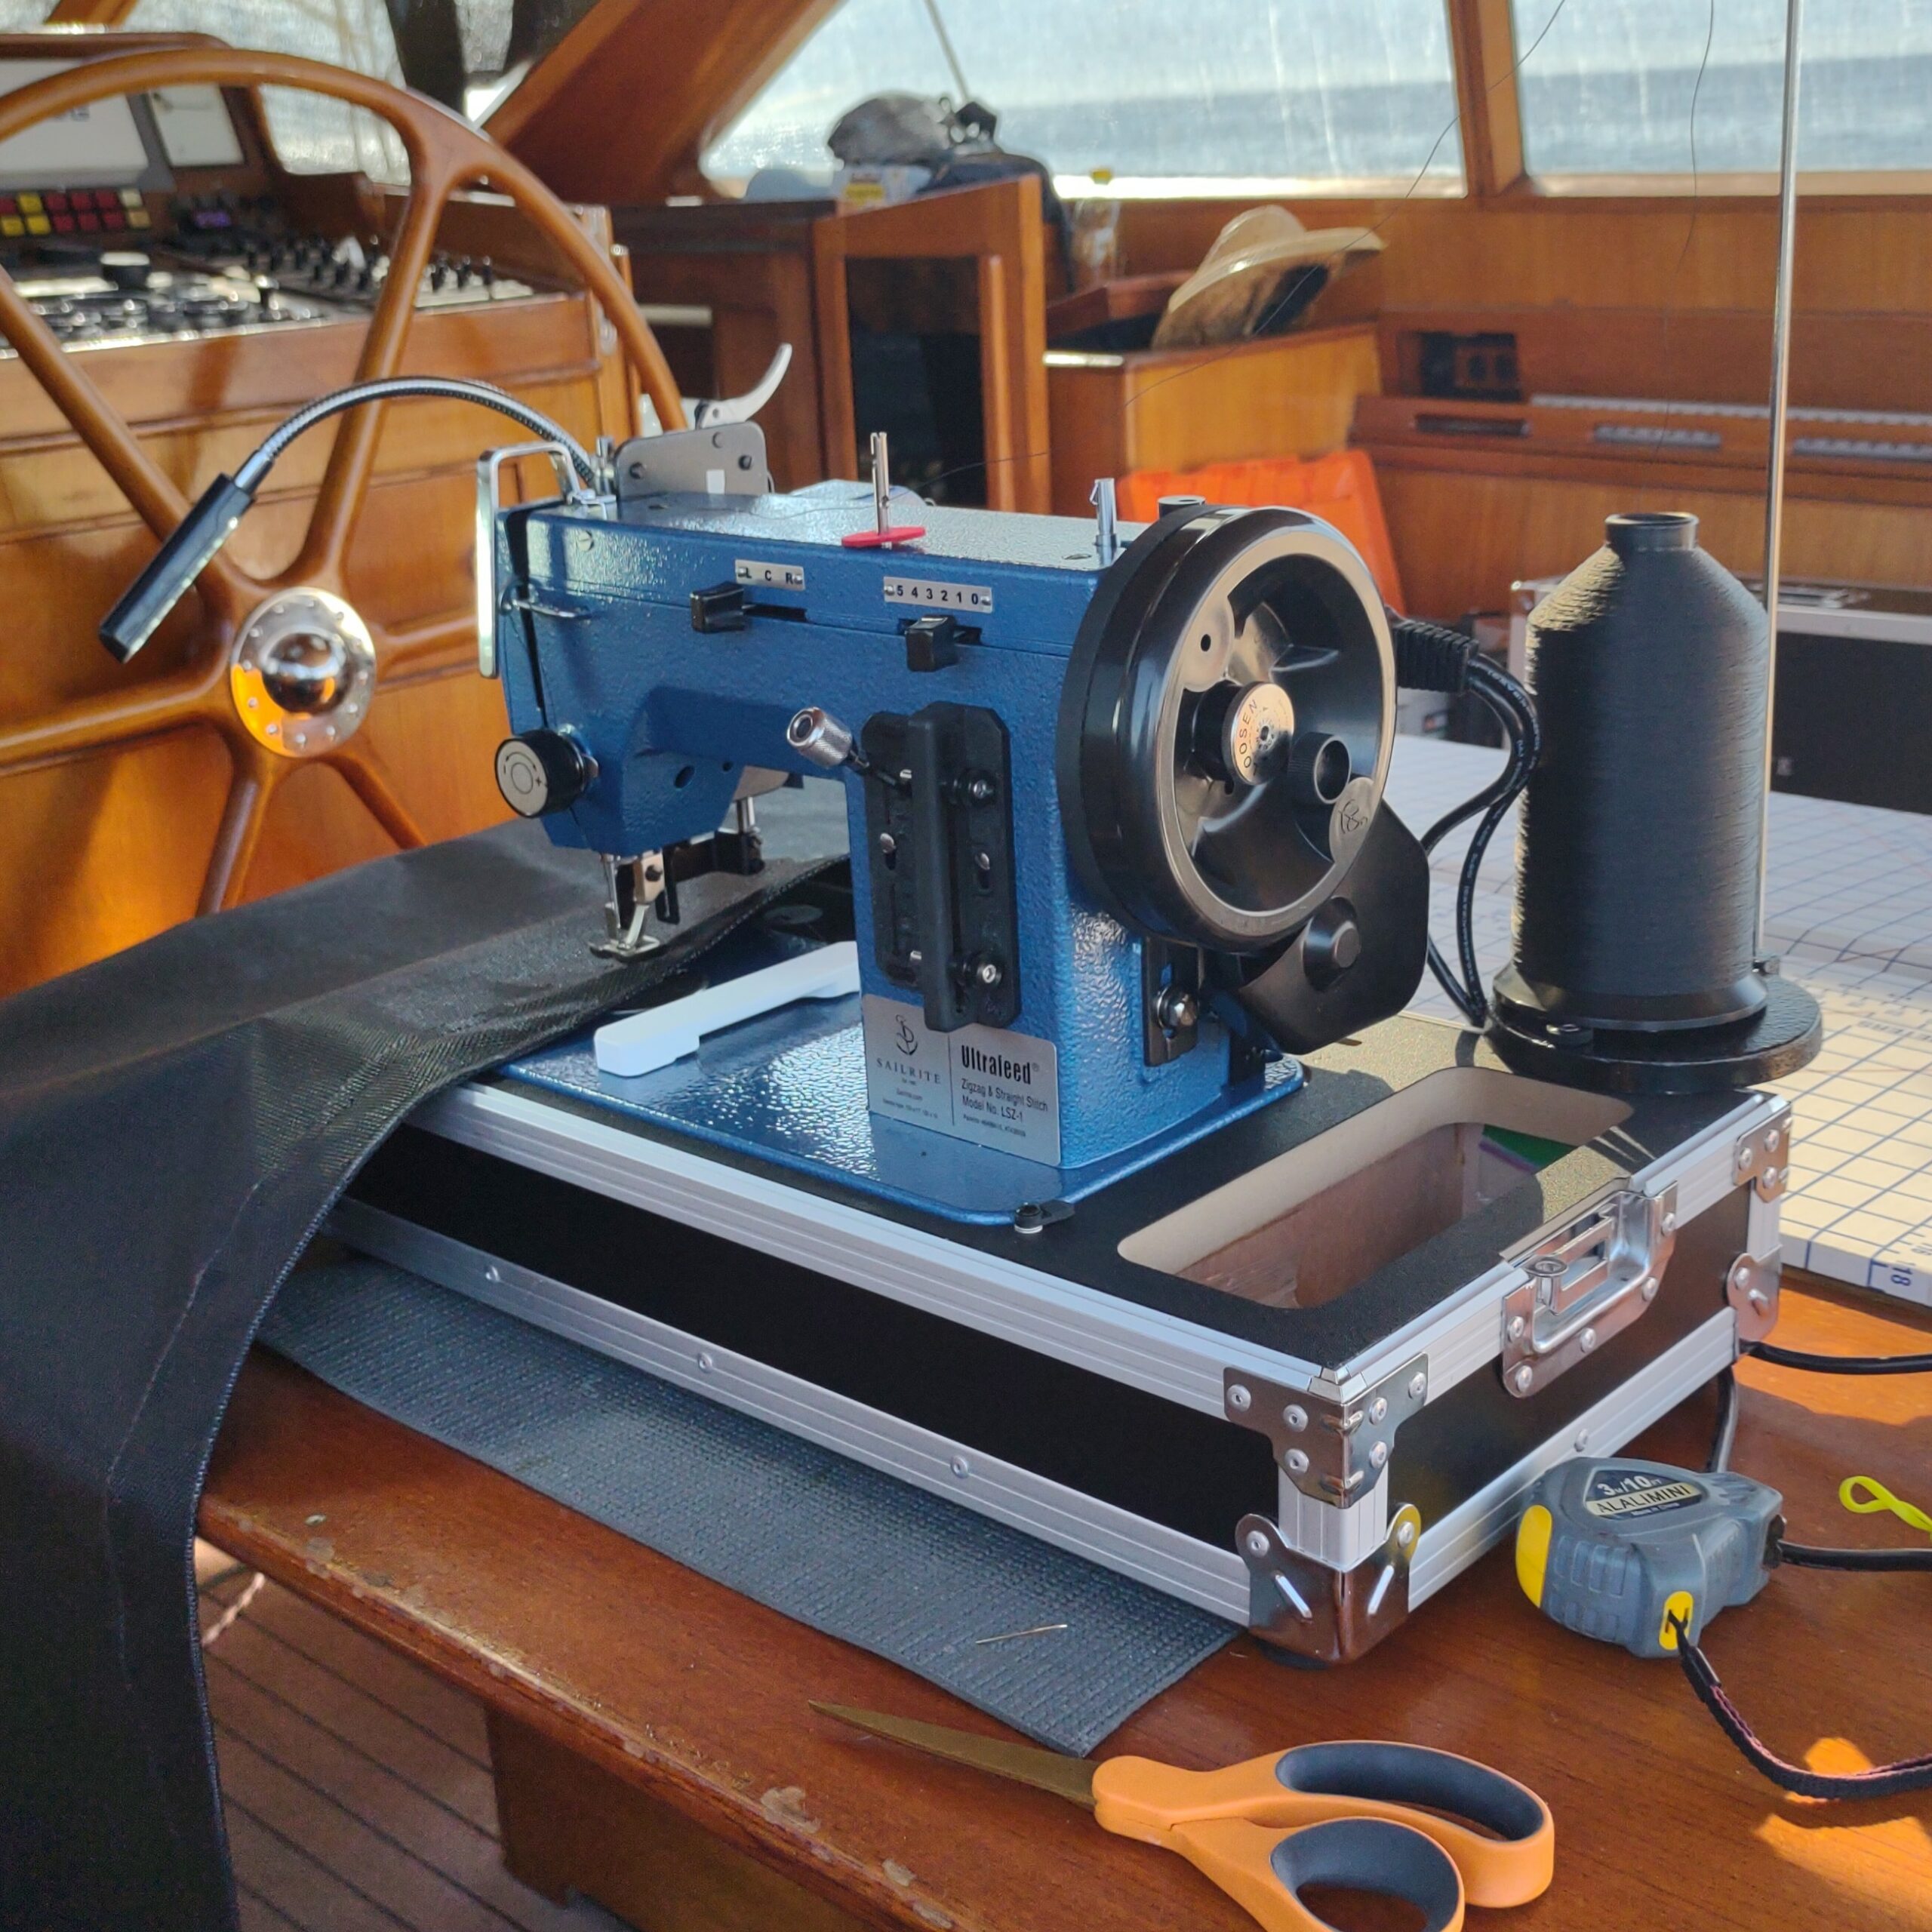
“Being on a cruising boat in this environment requires a certain level of self-sufficiency. I know how our boat was built. In addition, I know how to maintain it. Our Bristol Channel Cutter has beautiful bulwarks and I am often asked what I use to keep them looking so good. The secret is the Sunbrella® that covers them when the boat is not in use. My Sailrite® Ultrafeed® LSZ has been and continues to be an important tool for maintenance and self-sufficiency.”
Here’s Wayne with his Version 1 Ultrafeed LSZ.
The DIY of It All
Before the Mexico trip, Wayne had a dodger professionally installed on the boat. But after years in the sun and elements, the canvaswork and window vinyl were showing wear. Luckily, Wayne got a tip about a great DIY resource. “I first heard of Sailrite from other cruising sailors on our trip to Mexico. As the years went by, the dodger we had professionally made began to show signs of wear. With encouragement from Sailrite videos, I decided that I could remake the worn dodger panels. That was the beginning of lots of sewing projects.”
Wayne didn’t let his sewing inexperience stop him from tackling his own canvaswork projects. His desire to do things himself extends beyond boatbuilding. “I have learned to sew by trial and error. Most of my projects are on our boat. However, I find myself watching all kinds of Sailrite do-it-yourself videos that have nothing to do with my projects, but contain techniques that I can use.”
As a skilled builder, he knew he’d need the right tools to successfully sew the planned enclosure and other projects for his boat. That’s when Wayne knew the right tool for the job was the Ultrafeed LSZ. “When I married my wife, an old Kenmore sewing machine came with her. It did okay on simple projects but was not up to the challenge of sewing multiple layers of canvas or leather reinforcements. My Ultrafeed LSZ has been a game changer, allowing me to build my sewing skills with each project. I have made mistakes along the way, but each mistake has been a chance to learn techniques and more about the machine.”
This slideshow requires JavaScript.
Referencing Sailrite how-to videos, especially on dinghy chaps and dodger builds, expanded the teacher’s knowledge. Valuable skills like using basting tape, different seams, and Sailrite tools became crucial for successful projects.
Over the years Wayne has made dodger panels, mosquito screens, sail covers, cushions, curtains, a deck awning and more. Referencing Sailrite’s “How to Make Dinghy Chaps” video was a great help when a friend asked him to make the protective covers for his inflatable dinghy. “Valuable skills like using basting tape, the most common seams for canvaswork, and the advantage of tools like the acrylic patterning ruler, Edge hotknife and patterning material, all were crucial to the successful construction of the dinghy chaps,” Wayne shared.
Advice for Others
To those considering sewing their own canvaswork, Wayne’s advice is simple: “Go for it and don’t be afraid to make mistakes. Follow the Sailrite videos for completing smaller projects. Make sure that your machine and thread are set up properly. Every project is a lesson and an opportunity to learn and build confidence.”
After all, learning new skills keeps you young — a sentiment echoed by a teacher whose journey brought a dream to life, one stitch at a time.
Watch the video below of Wayne’s build from hull to launch!
Who We Are
Sailrite is your one-stop DIY shop! We are a passionate crew of do-it-yourselfers who strive to equip you with the supplies and how-to knowledge you need to tackle your next project. Do you want to learn upholstery, leatherwork, canvaswork, hobby sewing, bag making or more? We have the fabric, tools, hardware, sewing machines and notions you need to master any DIY. And even if you’ve never sewn before, our tutorials and how-to videos are designed for beginners and experienced crafters alike.
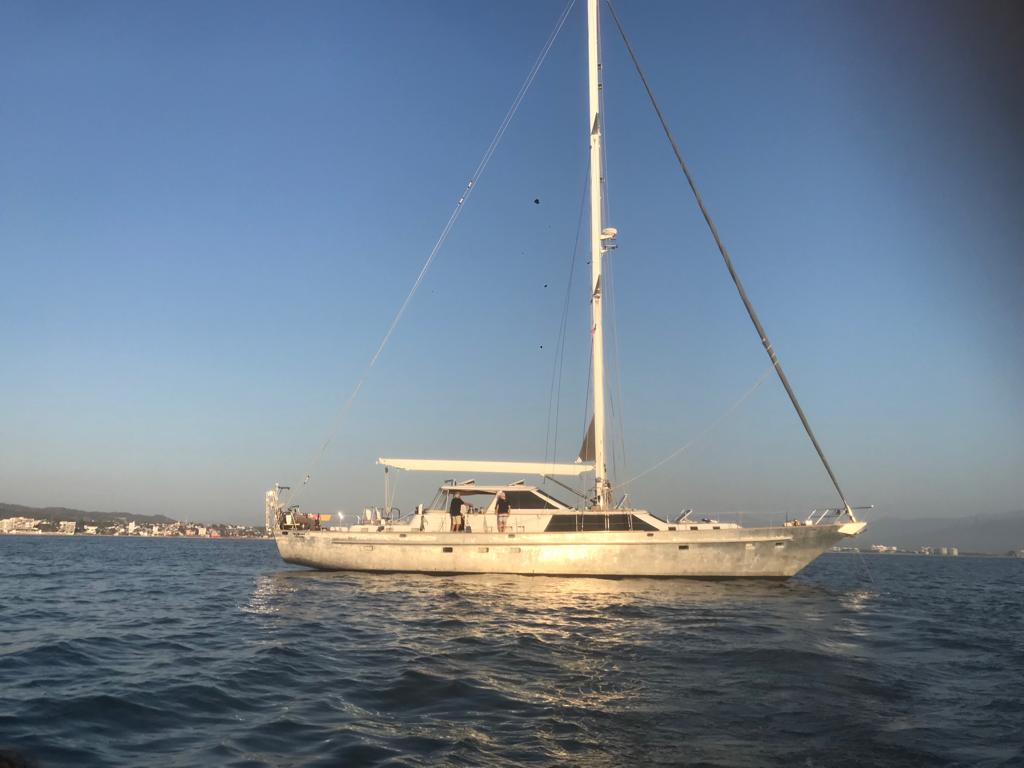
In 2019, Linda Jackson and her husband bought an 80-foot custom-built John Alden-designed sailing yacht. They live on the vessel full time, cruising the Pacific Ocean and working on the boat as they traverse the open waters. They’ve spent the past few years updating and refitting “SV Duende.” For all things canvas and upholstery related in this massive restoration project, Linda turned to Sailrite® for her tools, supplies and educational content. Let’s learn more about this liveaboard couple and how Sailrite is an integral part of their DIY and sailing journey.
“SV Duende”
A Love of Sewing & Sailing
Linda grew up in a sewing family. “My dad was a capable mender and stitcher. My mom always had a sewing machine to make and repair clothes, and my sister is an accomplished seamstress.” There was no shortage of people around to teach her how to sew. Linda also learned to sew in school through home economics classes.
Those fundamental sewing skills she learned at a young age would pay off when it came time for the supersized projects onboard.
When the couple left their landlocked lives behind and transitioned into liveaboards, it wasn’t a decision they made lightly. They took a yearlong sabbatical from work to cruise the Pacific coastline from San Francisco to Zihuatanejo on their first sailboat in 2001. After that trip they were hooked on an oceanic lifestyle, but it took another 10 years to engineer their work and life arrangements. The final step was to find a boat that they felt was the right size and configuration for them to live aboard full time, first a 50-footer, and now Duende.
“It was a big decision,” Linda recalled. “But once we were committed and started to divest ourselves of all the trappings of a land-based life, we started to feel more and more free. We are all-in on this lifestyle and don’t own anything that can’t fit on the boat – that means no storage units and no boxes gathering dust in anyone’s basement.”
Ready, Set, Sail
Once the mechanical and structural part of the current refit on Duende was well underway, Linda turned to the fun part — sewing! She knew she’d need a sewing machine tough enough to handle the daunting project. Luckily, Linda was already familiar with Sailrite and the Ultrafeed LSZ. “A new Sailrite [Ultrafeed LSZ] was at the top of my list. There was a long list of to-dos that required the power and capability that Sailrite offers. I treated myself to the top of the line, and am glad that I did.”
Sailrite was there to help her every step of the way: “From the first email I sent, the team at Sailrite have been true allies to me with all my projects. They are an expert source, and so willing to freely supply invaluable tips and tricks. They first helped me with material selection, and more than anything, validated my approach.”
With such a daunting undertaking ahead of her, Linda broke the project down into manageable sections. She started with the exterior window coverings. “‘SV Duende’ is a big boat and, therefore, everything that gets built for her is big,” she explained. There are 6 large window covers, and the front windshield alone is 12 feet across and 4 feet high. During the course of the window covering project, she mastered pattern-making with Dura-Skrim® Patterning Material, discovered how indispensable basting tape is, and learned how to use a binding attachment on her LSZ. “I perfected a few techniques and got better at controlling my stitches. The window coverings came out looking very professional.”
This slideshow requires JavaScript.
The Pilothouse Enclosure Project
With that successful DIY under her belt, she turned to the large pilothouse enclosure project. Linda knew the enclosure project would have to be done in stages, but she was determined to take on the work herself … well, almost. “I tried to bribe [Sailrite DIY instructor and videographer] Eric Grant with a trip to Puerto Vallarta and all the lobster he could eat if he’d bring a team down and [sew the pilothouse enclosure] in exchange for promotional and video rights — but that’s another story.”
This slideshow requires JavaScript.
First, Linda took apart the existing enclosure panels to figure out how it was constructed. She used the old panels as a template and was able to modify and improve the design. “The panels are 44 inches tall and cover an area of 30 feet around the aft end of the pilothouse. I purchased Strataglass 30 gauge for the new panels and followed the method shown in Sailrite’s video ‘How to Make an Enclosure Aft Curtain,’ adding Sunbrella® facing to the edges.”
Linda also referenced Sailrite’s “How to Make a California Dodger” video. Between the two tutorials, advice from the Sailrite DIY experts and her own ingenuity, she conquered the pilothouse refit with amazing results.
“I started with the forward starboard panel, and the biggest stress moment was when I made the first cut on the first sheet of Strataglass™. I’d never worked with it before and I was so nervous,” Linda confessed. All that prep work paid off. Her patterning was accurate and the panel came out looking great.
She quickly moved on to the other panels, improving the process and her sewing along the way. “The starboard and port corners were the hardest thing I’ve ever made. But when I was finished, [the panels] all zipped together so beautifully, and the end result was a huge upgrade. By the time I was done, I’d really figured out how to make it work.” From start to finish, the enclosure project took just two months.
Lessons Learned & Advice for Others
After completing these two massive projects, Linda had a wealth of experience and tips to share with our readers. Here are her “lessons learned,” as she put it:
Use the Sailrite Learn center on the website. Watch lots of different videos. Some of the pros have different ways of doing things, and it’s good to see all the methods so you can pick what works best for your project.
Don’t skimp on quality — having the right tools and materials for the job makes all the difference. Linda’s essentials: Sailrite Edge Hotknife, Canvas Patterning Ruler, soapstone and grease pencils, the clear acrylic ruler, patterning material and basting tape.
Check your bobbin thread frequently! There’s nothing worse than getting halfway down a long seam and running out of bobbin thread.
Go slow — the LSZ is a powerful machine and you must focus on controlling the stitches, especially around curves and tight corners.
Don’t be afraid. Your confidence will build with every successful seam.
Ask Sailrite — they are always ready to help!
Thinking about a liveaboard lifestyle? Here’s what Linda has to say about living full time on the water:
“Living on a boat is not for everyone – you have to be physically fit and strong, and confident in your ability to handle whatever comes your way. And of course, it helps a lot if you can make and fix things. A yacht is like a little city – we create our own energy, make our own water, manage our own waste systems, and maintain everything. Being self-sufficient is not an option, there’s no one to call for help when you are thousands of miles offshore. It’s a lot of work, but so rewarding. We love the ability to change our location frequently and have new adventures in places that few people have the opportunity to visit.
Thank you so much for sharing your story and DIY experience with us, Linda. We wish you all the best on your future sewing projects.
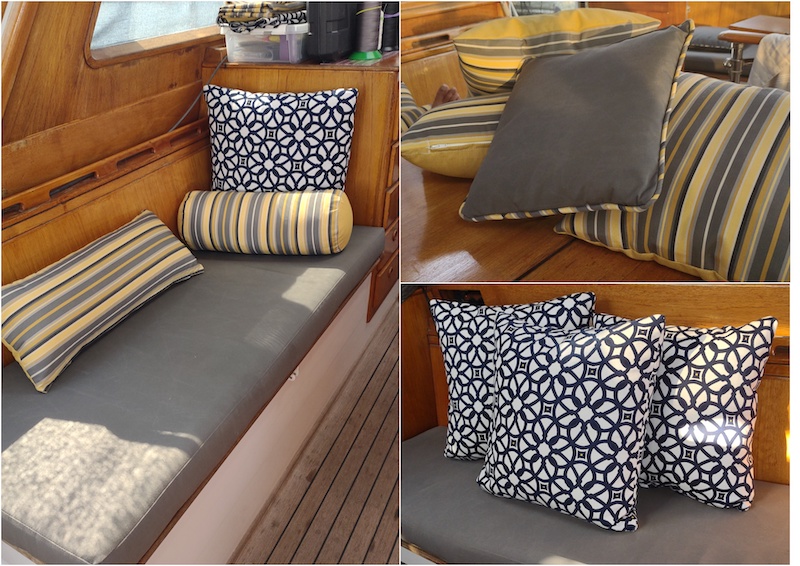
New pillows and cushions add the final touch to the cabin.
Who We Are
Sailrite is your one-stop DIY shop! We are a passionate crew of do-it-yourselfers who strive to equip you with the supplies and how-to knowledge you need to tackle your next project. Do you want to learn upholstery, leatherwork, canvaswork, hobby sewing, bag making or more? We have the fabric, tools, hardware, sewing machines and notions you need to master any DIY. And even if you’ve never sewn before, our tutorials and how-to videos are designed for beginners and experienced crafters alike.
Patrick Fiega is no stranger to the water. He spent his summers as a child at his grandparents’ cabin on an idyllic lake in Northern Wisconsin. It’s there where his grandmother taught him how to sail and sew — two life skills that have served him well. He has assembled three Sailrite® Sail Kits for his sailboat with help from the Ultrafeed® LSZ Sewing Machine. We chatted with Patrick to learn more about his sailing adventures, his love of DIY, and how Sailrite® has helped him along his sewing journey.
Patrick has owned many sailboats over the years but only recently started sewing his own sails. He purchased his current boat, a 1968 Cal 40 named “Wheee Dogggie,” in 2007. Relying on local sail lofts left much to be desired. “The local sail shops came up shy, didn’t respond or were outrageously priced. With the right sails, she can be very quick. I thought DIY could be a great option.”
As a jest, Patrick named his at-home sail shop Pants-Free Sails. He is his only client. “I get great service and support,” he joked with us.
Patrick’s first Sailrite Sail Kit — a staysail.
He has made several sails for his Cal 40. His first project, however, was not a sail. “I started my Sailrite adventure with a mainsail stack pack. I made my own design in AutoCAD, then ordered the Ultrafeed LSZ and all materials from Sailrite.” After that successful DIY, Patrick knew he was ready for more.
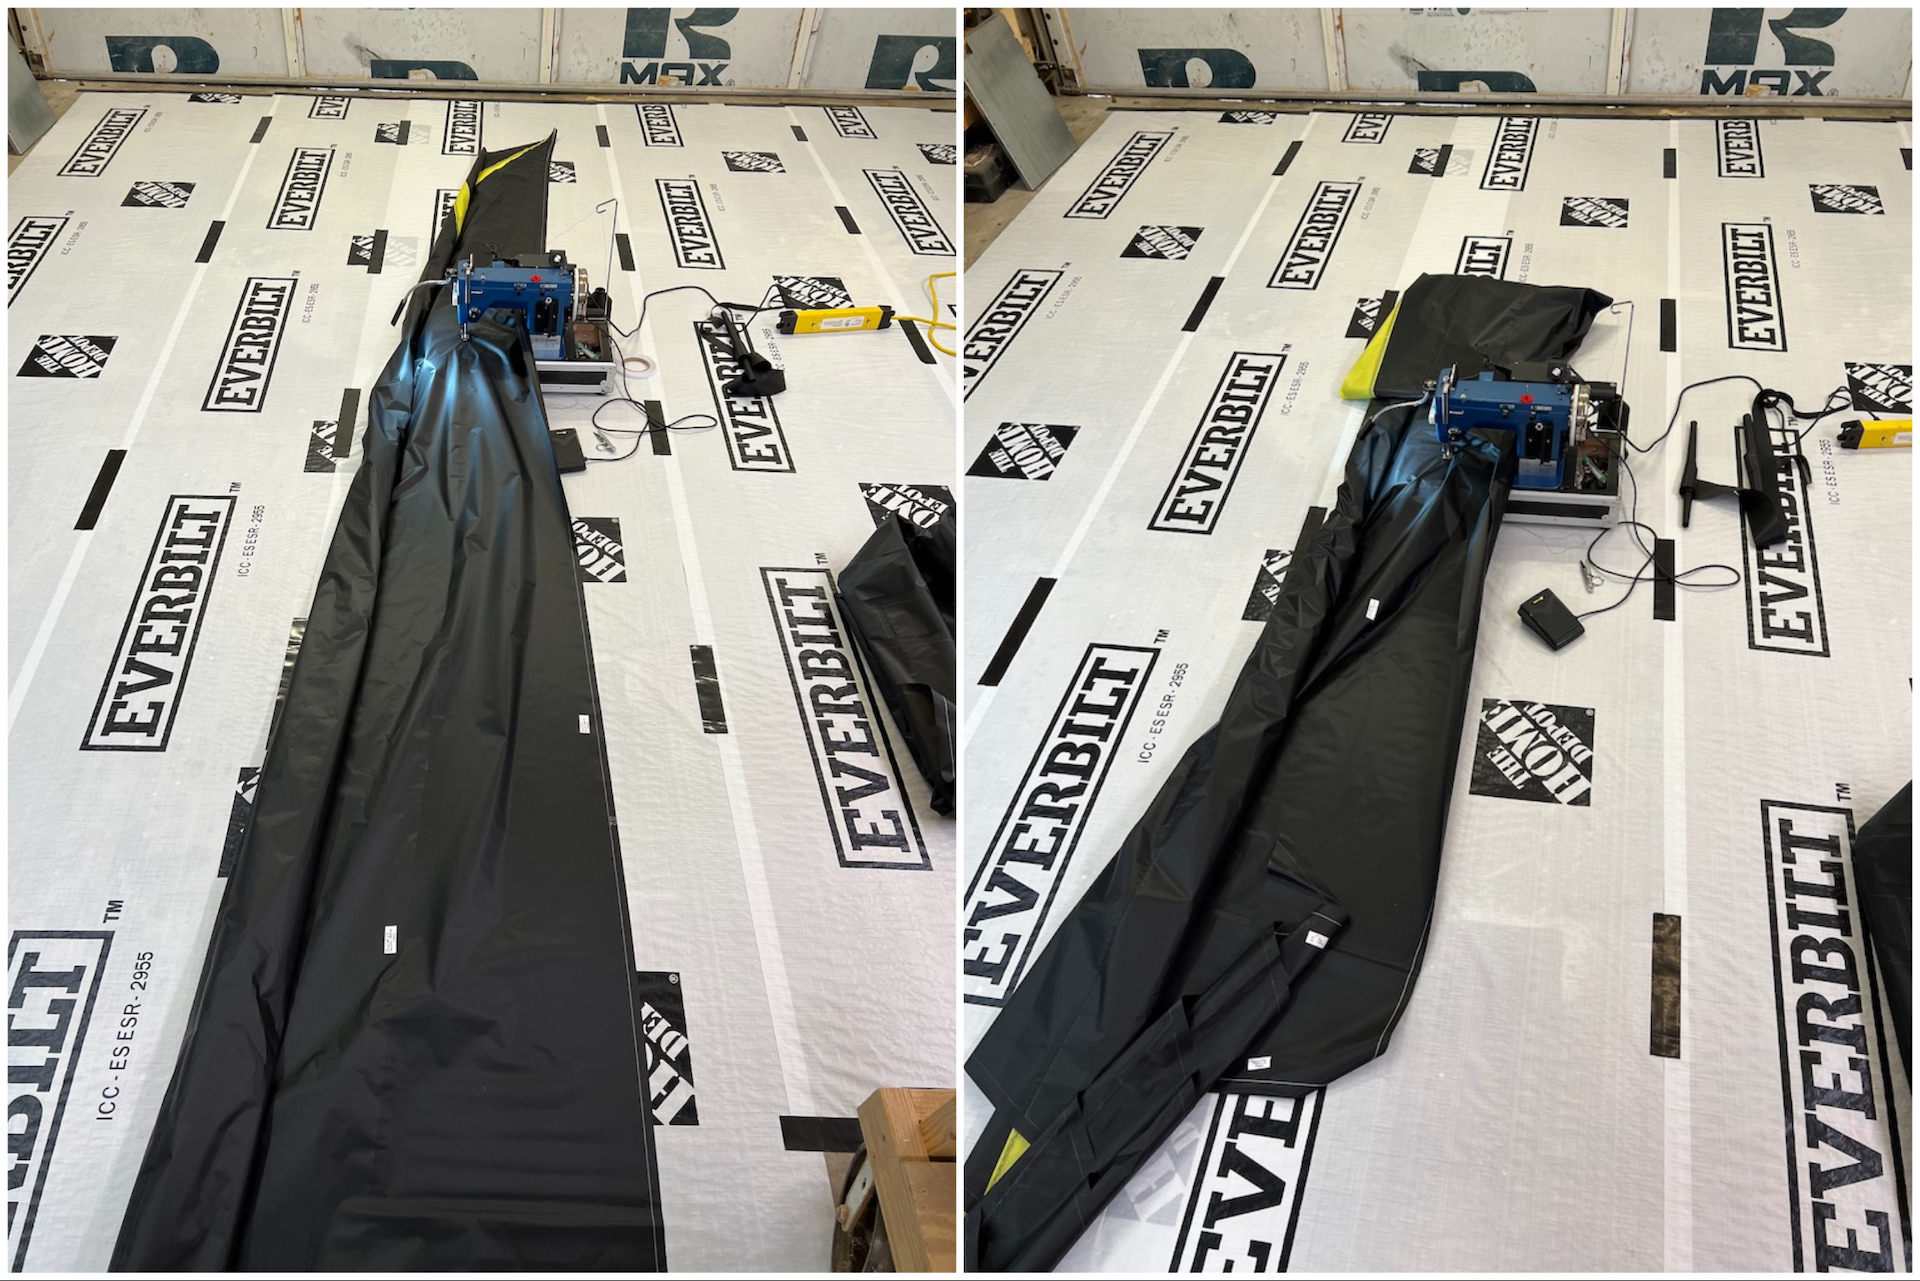
Next up was a 170-square-foot staysail — his first attempt at sailmaking. “I wanted to stay small and hope for the best. I was quite surprised at the ease of assembly. I planned for this sail to be used as a staysail or hanked onto the forestay as a storm sail.”
Patrick’s 125% genoa (right).
His next sail presented a new challenge that Patrick was eager to conquer: size. Patrick had to relocate his 800-square-foot asymmetrical spinnaker several times throughout the assembly and sewing process. He started building it on his boat, then quickly realized he needed more room. So he brought it home where the sail engulfed his living room, dining room, entryway and breakfast bar. Finally, he cleared out his garage and finished it there.
“This sail took me about three weeks to build, working when time allowed. When I started this build, I had one thought in mind — using it during the Harvest Moon Regatta from Galveston to Port Aransas, Texas. At about 5 a.m., 15 hours into the race, the winds switched direction and died. The Code 0 went up and gave us the ability to move forward in the fleet. I think it was due to this sail that we placed so well in our division — first across the finish line and second on corrected time.”
Keep reading to learn more about Patrick, his experiences with sailing and sewing, and his advice for DIYers interested in sewing their own sails.
Q. What do you love most about the sailing lifestyle?
A. I have always loved the water and long for blue water sailing. It is an amazing feeling to be able to use the wind and water for traveling to exotic destinations. The feeling of freedom when you untie the lines and start toward your next port of call.
Q. Do you live on the coast? How often do you get out on the water?
A. I live on the Texas coast. Kemah is a unique community, located on the west shore of Galveston Bay. I am on the water anytime I can manage it. In most cases, it is weekend sails or club racing on Galveston Bay. I have plans to take some longer, coastal sails soon, which is why I needed newer sails.
This slideshow requires JavaScript.
Q. How did you first learn about Sailrite?
A. Back in the early 2000s, I saw another sailor working on their canvas. They were using a Sailrite machine. I was impressed by its ability and the ease of stitching through many layers of heavy material.
Q. What made you choose the Ultrafeed LSZ? How has the machine performed for you and what is your impression of the WorkerB® Power Pack Motor System?
A. I purchased it due to the strength of the machine and the ability to handle heavy sailcloth. The machine has been wonderful and very dependable. I have had “moments of learning,” those times when I did something wrong and caused additional problems. I did find tips on the website that helped me work through the problems and taught me what to do better the next time. The WorkerB made stitching thicker material much easier. Having the ability to press the pedal and know that the speed will stay at the speed needed for the thickness of the material is wonderful.
The asymmetrical sail took up so much room that Patrick used dowels under the rolled up sail fabric when the weight of the assembly caused too much drag.
Q. What advice would you give someone thinking about sewing their own sails?
A. You need space! The basting tape [included in the Sail Kits] was a game changer for me, helping hold the panels together while I stitched them. It really isn’t hard; use the instructions and the lines plotted on the fabric. [Sailrite Sail Designer] Jeff Frank puts everything you need into the kit! Take one panel at a time and break the sail down into quadrants; this will make the project less daunting. Think about the stitching ahead and put together panels that can be easily rolled up and fit under the machine arm.
Q. Is there anything else you’d like to share with our readers?
A. I was raised with the mindset of, “If you don’t know how to do something, learn and figure it out.” This is where Sailrite came into my sailing life. I enjoy having the ability to do it myself. I also struggle with local sail lofts that do not respond, fail to make proper measurements and yet charge exorbitant amounts for sails. Doing it yourself puts all of this in your own hands. It gave me a feeling of pride that my DIY sails landed us top of the pack in our latest regattas.
Thank you so much for sharing your story with us, Patrick! The pride and sense of accomplishment that comes from mastering a new skill or technique is a universal feeling every DIYer can relate to. What’s next on Patrick’s DIY list? In addition to another sail project — a 100% jib — he’ll be working on a custom dodger attachment to his hardtop bimini, new cushion covers for his boat cabin and patio cushions for his home.
When you have the talent, creativity and determination to do it yourself, there’s no limit to what you can make!
Who We Are
Sailrite is your one-stop DIY shop! We are a passionate crew of do-it-yourselfers who strive to equip you with the supplies and how-to knowledge you need to tackle your next project. Do you want to learn sailmaking, upholstery, leatherwork, canvaswork, hobby sewing, bag making or more? We have the fabric, tools, hardware, sewing machines and notions you need to master any DIY. And even if you’ve never sewn before, our tutorials and how-to videos are designed for beginners and experienced crafters alike.
You’ve probably heard someone use the saying, “the dog days of summer,” to talk about the hottest and most humid days of the year. But did you know that this phrase originated in Ancient Rome?
You see, the astronomers of the time noticed that the sweltering weather coincided with the period that the star Sirius, also called the “dog star,” was visible in the night sky. The astronomers thought that Sirius was adding its heat to the sun’s to make the days hotter. They started calling this period “the dog days of summer” after the dog star, and the nickname stuck.
Today, this phrase usually refers to a period from early July to early August, when temperatures tend to skyrocket in the Northern Hemisphere. And the heat doesn’t just bother humans. Our dogs are just as vulnerable — if not more so — because of their higher body temperatures and fur coats.
Sailrite customer and small-business owner Katrina Fairchild frequently ran into this problem in 2017 when taking her therapy dog, Harley, kayaking with her. A sweet Shih Tzu, Harley is the perfect size to sit on the bow of Katrina’s kayak and take in the sights and smells of the outdoors while Katrina paddles.
On or off the kayak, Harley loves exploring the outdoors.
But while Katrina could paddle for hours under the hot sun thanks to hats, sunglasses and sunscreen, Harley didn’t have much fun on these excursions. Katrina told us more: “[Harley] and I are pretty much inseparable. [He] is with me in stores, hotels, in the car (unless it’s too hot), restaurants, hiking, biking and on the water. He’s very tolerant of most things except one: the sun.”
Sitting on the bow of Katrina’s kayak, Harley had nowhere to hide from direct sunlight or high temperatures. “Harley would display discomfort by constant agitation after just a short time on the water,” Katrina said. “He panted like he’d just run around in the sun. Even if I poured water on him or dipped him in the river, he still couldn’t relax.”
Harley’s discomfort was contagious. “This intolerance of getting too much sun and its reflection off the water while kayaking prevented me from enjoying my relaxing time paddling. I had to rush back to shore too soon,” Katrina said. “I also had to fix this problem.”
As the saying goes, necessity is the mother of invention. Katrina needed to make sure that Harley was safe so she could enjoy her time outdoors. She was proud to tell us that she did indeed fix the problem — with help from Sailrite® and the Ultrafeed® LS Sewing Machine.
Inventing the WoofShade®
So, how did Katrina address the issue of taking a dog kayaking in high heat? “[In 2017], I developed a prototype of what became [the] WoofShade.”
What’s a WoofShade? It’s Katrina’s invention to protect paddling pups like Harley from excessive heat and direct sunlight. It’s a portable, dog-sized shade — the first shade designed to attach to paddle-powered watercraft like kayaks.
This slideshow requires JavaScript.
Katrina told us more about developing the WoofShade. “I went through about three months and two prototypes of design and testing. Deciding on the shape was probably the most challenging.”
At the end of the prototyping, she had settled on a large-diameter circle with flexible internal wires that allow the shade to bend. When attached to the front of a kayak, canoe or paddleboard, the shade becomes a self-supporting tent that perfectly accommodates small- to medium-sized dogs without blocking the paddler’s view of the water in front of them.
But size wasn’t the only consideration. Katrina also had to find the perfect fabric. “I needed a high-quality, marine-grade, perforated mesh material that was see-through and provided ventilation for the dog,” she said. She didn’t have too far to look to find exactly what she wanted. “Once I saw a sample of the Phifertex® [Standard Vinyl Mesh Fabric], it was a no-brainer.”
The fabric, which has a 70% shade factor and good breathability, is ideal for applications that get heavy use outdoors. The fabric is also easy to sew — a helpful feature since Katrina hadn’t sewn for quite some time.
“I learned to sew in the ’70s as a child on my mother’s [home] sewing machine, which I still have,” she told us. “I was motivated by wanting more clothes for my Barbie® dolls.”
Once her dolls had full wardrobes, however, Katrina didn’t do much sewing until she started prototyping the WoofShade in 2017. In fact, she sewed the prototypes on the same machine her mother taught her to sew on years earlier.
Although she had to relearn how to sew after decades and her home machine wasn’t quite strong enough for the job, Katrina’s determination to keep Harley safe kept her going. She eventually finished a usable prototype and wasted no time seeing if Harley liked it.
This slideshow requires JavaScript.
“As soon as I used my first prototype, [Harley] was able to relax enough to sleep for almost the entire duration of the kayak trip. This, in turn, made my paddling much more enjoyable because I knew Harley was comfortable and safe,” Katrina shared. Now, “he is eager to get in the boat and gets situated quickly in his usual position under the shade.”
Manufacturing WoofShades With the Ultrafeed LS
Thanks to Katrina, Harley isn’t the only lucky dog to have a personal shade. “Once I realized how many other paddlers are accompanied by their dogs, I then decided to market [the WoofShade].” She built a website and an Etsy shop to share her pup-protecting product with the world. Other dog-owning paddlers loved the idea, and Katrina started receiving orders right away.
But filling those orders wasn’t an easy task. Her home machine didn’t have the power to consistently sew the tough materials that the WoofShade called for.
“For the first few years I battled with my [home sewing machine] to make her work for high-demanding, thick material, but she kept fighting back and won. … I was wasting too much time and churning out too many expletives,” Katrina laughed. “I knew I had to get the right machine for the job.”
The right machine turned out to be the Sailrite Ultrafeed LS. Katrina discovered Sailrite while researching her options for heavy-duty machines.
“Sailrite kept popping up as I looked at different companies and products,” she said. Her research and testimonials from other Ultrafeed owners convinced her that the LS was the best machine for her needs.
“I trusted Sailrite to sell the right, high-quality, semi-heavy-duty machine that I noticed a lot of hobbyists and small business owners were using. And it wasn’t too expensive,” Katrina told us. She purchased her LS in 2020 and has been happily using it to run her small business ever since.
The Ultrafeed turned out to be a wise investment. “[My LS] has elevated my sewing abilities and skills. It never lets me down — it’s a workhorse,” Katrina said.
The LS makes it easy for Katrina to sew Phifertex shade material.
She’s also found Sailrite to be a reliable supplier of the Phifertex shade material she uses, and a few Sailrite tools have made their way into her sewing room. But while it’s “fun and inspiring to look at all the supplies and parts that Sailrite sells” and pick out a new tool now and again, deep inventory isn’t the only thing that keeps Katrina coming back.
When we asked what Katrina likes so much about Sailrite, she said this: “Quality and excellent customer service. Over the years I’ve needed help … Sailrite has yet to let me down.”
In particular, Katrina mentioned that she loved Sailrite’s videos on setting up and using an Ultrafeed. “Not only is there a video for just about everything I needed to know, but each is well done and informative,” she said.
More Time for Outdoor Exploration
After Katrina purchased her LS and watched several Sailrite videos to get up and running, making the WoofShade not only became easier, but quicker too — which was exactly what she wanted.
“I run this company part time,” she told us. “[The WoofShade] has proven to be a seasonal product, which I don’t mind because I enjoy doing so many other things.”
As we’ve already seen, Katrina especially loves being outdoors. Her goal is to get outside every day. “Anything in nature is my happy place,” she said.
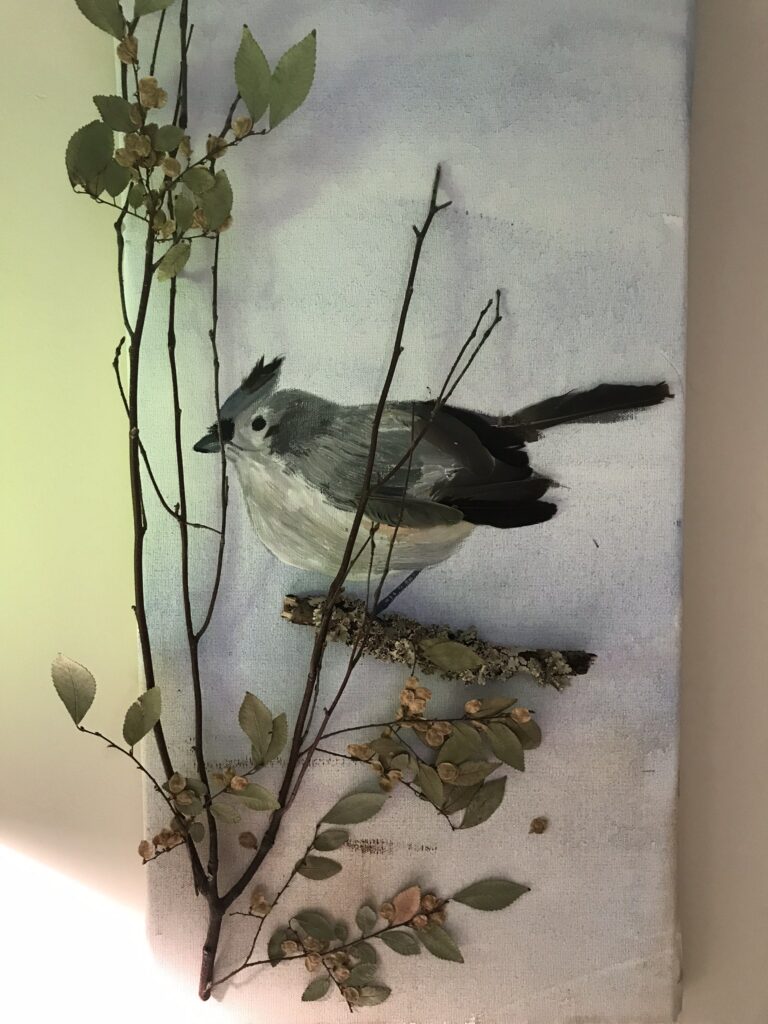
Among her other outdoor hobbies are “hiking, biking [and] walking.” She also told us that crafts and painting make her happy, especially when she can incorporate interesting natural items into her artwork.
Katrina used real branches to give this bird painting a 3D effect.
In addition to land-based outdoor activities, Katrina has experience with other types of boating besides kayaking. She’s dabbled in waterskiing and using powered watercraft, but those didn’t catch her attention as much as using paddle-powered boats.
“Paddling has become my absolute favorite because the boats are quiet, easily transportable and allow me to connect with the feel of water that I love,” she shared. “Kayaks are especially my favorite because I’m closer and more a part of the water than in a canoe.”
Her preference for kayaks over canoes has a humorous origin. “My first experience with paddling was 32 years ago when my then-boyfriend rented a two-person canoe to paddle the Buffalo River in Arkansas. We dumped with the first Class II rapids, cursed at each other, got married and then bought separate kayaks,” Katrina laughed.
While her home state of South Carolina offers waterways to paddle, Katrina prefers to travel a bit farther for kayaking adventures. “I … go out of state because I don’t find that South Carolina offers enough of the kind of paddling I like, which is quiet lakes or Class I rivers. I go to North Carolina quite a lot, but recently went all the way up to the Adirondacks in New York.”
Of course, Harley goes with Katrina and her husband on these out-of-state adventures. And a new addition to their little family will soon be going with them. “I have recently adopted a rescue puppy that is half German Shepherd,” she told us.
Katrina’s adorable rescue puppy, Sky.
The puppy, appropriately named Sky by her nature-loving parents, has some skills to master before she’ll be ready for long outdoor excursions. “We’re working on the proper hiking etiquette,” Katrina said. “As soon as [Sky] learns to behave, I’ll be teaching her to trot alongside my bike.”
Sky will also have to learn how to be on the water before she can go paddling. “I need to get her on a boat sooner than later. The rocking motion is probably the scariest to overcome,” Katrina said.
Sky will be much larger than a Shih Tzu when fully grown, so a sit-on-top kayak won’t be the best option for her. Katrina will have to expand her fleet of watercraft to accommodate Sky. “Yes, I will be buying a canoe,” she laughed.
Having a larger dog will mean a larger boat for Katrina … but could it also mean a larger WoofShade? Many other paddlers have requested a shade that can cover large dogs, and Katrina says that is the biggest challenge she’s faced with her invention to date.
“I’ve tried to accommodate the large-dog-breed owners’ request for a taller WoofShade. However, a taller shade … will impede the line of sight of the paddler,” she shared. “After a multitude of prototypes, we have found that the best way to take your large or tall dog paddling is in a canoe, in which case our current single-size WoofShade will provide the dog coverage without obstructing the paddler’s view.”
This makes sense. Large dogs will have plenty of space under the shade if they sit down inside of a canoe rather than on top of a kayak. Still, we have a feeling that Katrina’s love of innovation will lead her to a kayak-friendly shade for large dogs eventually.
Katrina’s Parting Advice for DIYers
After all, Katrina loves coming up with new ideas. She told us that the “constant challenge to [her] mind” is her favorite part of her DIY lifestyle. “I hate being bored, so I’m always coming up with small and large projects to keep me motivated and stimulated,” she said. Whether it’s painting, sewing or collecting eye-catching nature finds, Katrina always has a project going — and plenty of inspiration for her next one.
She had a lot to say about ideas, including how to make an idea like the WoofShade into a real product. It’s great advice for any DIYer who isn’t sure where to start making their own product concept come to life.
“I’ve had many ideas over the years, but they were just that — ideas. It wasn’t until I did an actual prototype, which I used many times, that the idea became reality.” That’s a great roadmap for creating a new product. Start with a prototype of your idea, test it thoroughly and work out problems in the design along the way.
Once you’re ready to share your design with the world, what then? Katrina had advice on launching a small business too. “Like many other small-business owners will say, start small and think big. At first, keep it small and manageable. Keep your day job. If it’s still fun, or at least pleasing to do, then consider growing it.”
Katrina has hit on a fundamental aspect of a successful DIY lifestyle or career: If you enjoy what you’re doing and you feel the level of work is manageable, you’ll be able to enjoy your creative hobby or business over the long run. Katrina would know: She’s been happily running her small business part time since 2017.
“It’s sometimes hard to believe that I’m still making WoofShades after almost six years,” she said. “At one point I temporarily closed my shop, but the demand kept coming so I reopened it. I continue to make them because of this: If there are still dog owners who care enough to protect their paddling pets, then I will continue to help and sell WoofShades.”
We love that sentiment, Katrina, and we’re happy that your small business fits into your active lifestyle so well! Sailrite is proud to provide you with the tools and materials you need to help keep dogs like Harley and Sky safe and comfortable outdoors. We wish you all the best for many more years of DIY innovation and outdoor adventure!
Who We Are
Sailrite is your one-stop DIY shop! We are a passionate crew of do-it-yourselfers who strive to equip you with the supplies and how-to knowledge you need to tackle your next project. Do you want to learn upholstery, leatherwork, canvaswork, hobby sewing, bag making or more? We have the fabric, tools, hardware, sewing machines and notions you need to master any DIY. And even if you’ve never sewn before, our tutorials and how-to videos are designed for beginners and experienced crafters alike.
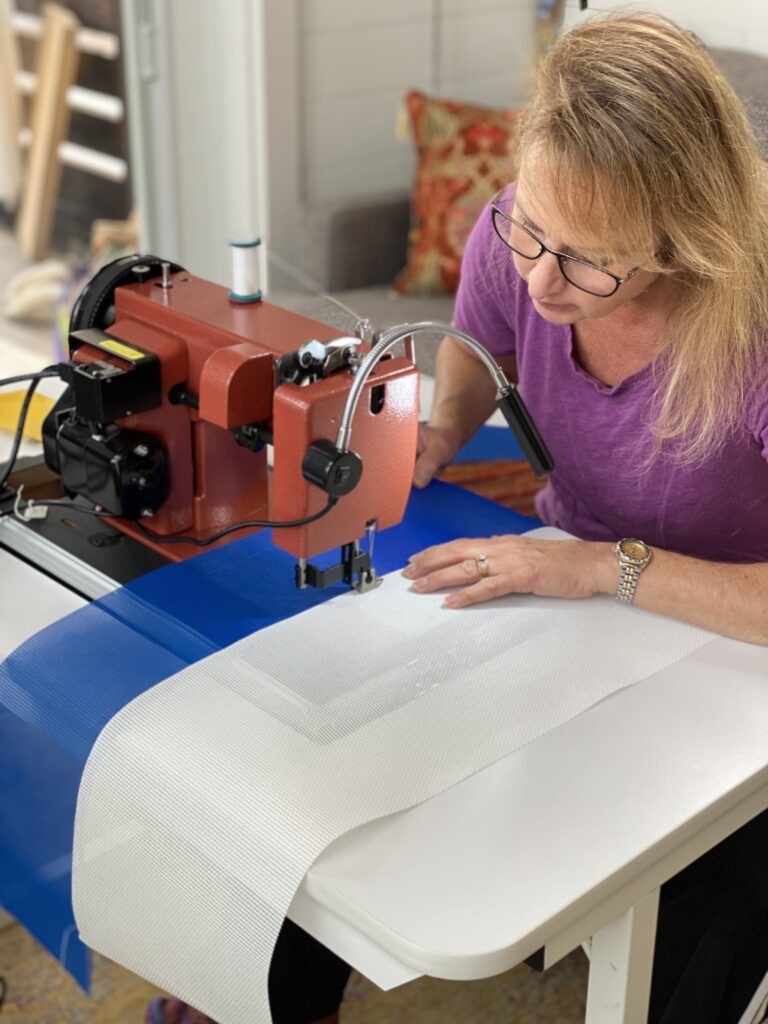
That’s the motto of Linda Butters-Freund, a dedicated sewer and co-owner of Florida-based small business Offshore & More Custom Canvas LLC. Given her impressive 63 years of sewing experience, it’s safe to say that there’s no project she can’t tackle.
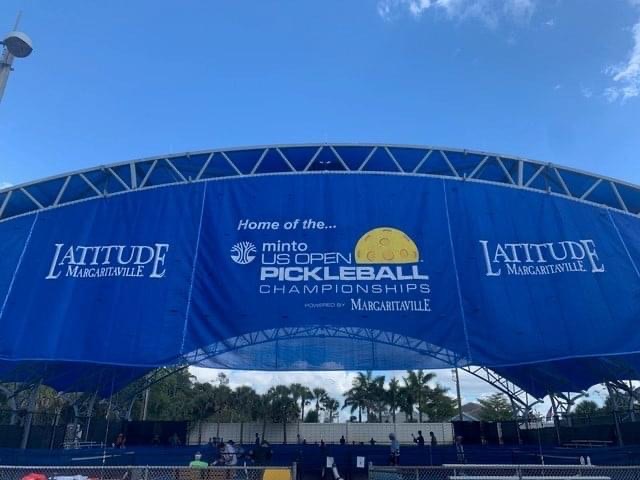
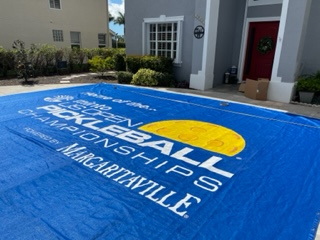
“There has never been a project too big for me,” Linda said when we asked her about the largest project she’s ever done. That project? A huge shade panel for the U.S. Open Pickleball Stadium’s championship arena, completed in early 2021.
The shade panel covers the open front of the championship stadium, which is in Naples, Florida. During pickleball tournaments, it provides players and spectators alike with much-needed relief from high heat and constant sun exposure. It’s a new and improved version of the original shade panel, which was made in 2017.
As a longtime Sailrite fan, Linda knew just where to turn for her project materials. She purchased enough spur grommets and webbing from Sailrite to complete the hanging shade panel — with some to spare.
The panel’s massive scale made a large sewing machine a necessity. Luckily, Linda already owned a Sailrite® Professional Long Arm Sewing Machine when this project came around. With its extra-large throat, the Professional was the natural choice to sew the shade panel. “I honestly don’t think it would have been possible to use any other machine!” Linda said.
Introduction to Pickleball
Linda was already well acquainted with pickleball when she started working with the Naples stadium. She discovered the sport in 2012 while living on Florida’s Marco Island.
“I played tennis at the YMCA three times a week,” she explained. “I saw a flyer on the check-in counter announcing a clinic for pickleball. I signed up, started playing and realized that it was a much friendlier game … When I moved to Naples, I was fortunate to find a location nearby with lots of players.”
If you guessed that this “location nearby” was the U.S. Open Pickleball Stadium complex, you’re right on the money.
The stadium, which hosted the inaugural U.S. Open Pickleball Championships in 2016, consists of several open-air pickleball courts. Additionally, the championship court is covered by a large metal structure with fabric shade panels on the top and front. Linda started playing there before the original shade structure was built in 2017.
The Florida heat kept spectator numbers very low at the 2016 championships. Some shade, the stadium managers reasoned, would encourage more people to watch the tournament live in the future. They had the shade structure built soon after.
This slideshow requires JavaScript.
Although it greatly boosted attendance at the 2017 tournament, the structure had a major flaw. “[The] sunshades [were] made from a material that did not hold up to the elements,” Linda said. “[They] were fraying and the grommets were ripping out.”
The complex’s management needed someone to repair the shade panels — and they didn’t have far to look. Jim, the man in charge of the courts, soon learned about Linda’s sewing skills.
“[Jim] had seen some of my work from a player … I made personalized pickleball paddle covers. He asked [the player] for my name and contacted me,” Linda said. “I met with him, looked at the panels and said I would figure out a way to make repairs.”
Linda had never worked on such a large project before. But it’s never been in her nature to back down from a challenge. This tenacity and resourcefulness have served her well — starting when she learned to sew at 8 years old.
A Lifetime of Sewing Success
“I always watched my mother sewing clothes for my siblings and myself,” Linda said of her childhood. “I decided I would like to try my hand at it … I had some dolls that needed clothes! At that point everything I made was stitched by hand.”
It wasn’t long before Linda graduated from hand sewing to using a machine — after her search for just the right fabric for a project got a little out of hand.
“I decided to make a wedding dress for my Barbie® doll … I used my Easter dress slip/petticoat for the fabric. The ‘gown’ was beautiful! My mother was really impressed with my creativity until she realized what I had used to make it with!” Linda laughed.
Although upset that the dress slip was ruined, Linda’s mother saw that her daughter was serious about sewing. “[My mother] showed me the basics for using a sewing machine, gave me a box with extra fabrics and thread, and told me to have fun,” Linda remembered. “My world opened up and I knew sewing would always be a part of my life.”
In fact, sewing was Linda’s job long before she co-founded Offshore & More, and before she moved to Florida from the New England region.
In addition to teaching sewing classes, Linda has owned a dressmaking business (and in a humorous callback to her introduction to sewing, she made numerous wedding gowns). She also designed and sold canvas handbags at home showings similar to Tupperware® parties. The Massachusetts native had such success with her handbags that Yankee Magazine featured her in its small business section!
Linda’s canvas handbags, as seen in Yankee Magazine.
Later, Linda started her own marine canvas business after overhauling her family’s 40-foot yawl (a two-masted sailboat) with new upholstery and custom covers. Other than a short stint sewing for interior designers, she’s been entrenched in the marine sewing world ever since.
As an unstoppable entrepreneur, Linda has learned a lot about running a small business. When we asked what she would tell other aspiring business owners, she said this: “The most important advice I would give to someone who wants to start their own sewing business: LOVE what you’re doing! Every time I open the door from the house to my workshop, I look forward to working on projects.”
Sunshine, Shade Panels & Sailrite
Linda spent most of her life in the northern part of the East Coast — but by 2010, she was ready for a change of scenery. She decided to trade in bitter New England winters for the sandy beaches and ample boating opportunities of South Florida.
Around that time, she turned to Sailrite to bolster her marine sewing career. “I needed a company that would be able to supply all the tools and products required for my numerous projects. After hours of research, I came to the conclusion that Sailrite was my No. 1 choice!”
Linda’s familiarity with Sailrite was a big help when it came time to repair the pickleball stadium shade panels in Naples. She already owned an Ultrafeed® LS, but the large panels were often too bulky to fit through the compact machine’s throat. “I decided I needed a machine with a longer arm when I did repairs on the old shade panels,” she told us.
For this dedicated Sailrite fan, the perfect machine wasn’t hard to find. “Whenever a new project comes my way, I always do my research for supplies on the Sailrite website,” she said. “[It] is my go-to place to shop!”
That’s how Linda discovered the Professional Long Arm (now discontinued) and decided it was the upgrade she needed to repair the shade panel. “The added room under the arm made the ease of pushing 110-inch-wide material a breeze,” she said. “And being able to zigzag the rips really made the job easy!”
This slideshow requires JavaScript.
Thanks to this upgrade, Linda became the pickleball stadium’s go-to project person. She kept up with repairs on the original shade structure until 2020, when something happened that was too big to fix.
“A windstorm came through Naples and shredded the original stadium,” Linda said. “[It] had to be replaced due to hurricane-force winds.” There was no denying it — the shade panels on top of the original stadium were done for.
The windstorm did a lot of damage to the original shade structure.
Somehow, the branded shade panel on the front of the stadium survived the storm. But its reign didn’t last much longer.
A new metal structure and shade panels were in place by the end of 2020. That’s when “[the stadium’s management] decided that the old shade panels [for the front] … needed to be replaced. They contacted the stadium company to inquire about purchasing material to match the [new] structure.”
This slideshow requires JavaScript.
Jim, the stadium’s manager, turned to Linda for help making the raw fabric into a single shade panel to cover the stadium’s front. It would be Linda’s largest project ever, but she was determined to face the challenge head-on.
The Making of a Shade Panel
Armed with the new shade fabric, her Professional Long Arm and the materials she purchased from Sailrite, Linda got to work on the front panel in January 2021. She didn’t have much time — that year’s Pickleball Championship tournament was scheduled for April. Fortunately, she also wasn’t alone.
You see, Linda’s son Michael and his family also live in Florida. Linda had taught him how to sew when he was growing up in Massachusetts, and he’d helped with some of her previous projects. Just like his mom, he’d caught the sewing fever.
“[Michael] wanted to get back into the canvas business,” Linda told us. “He asked me if I would like to make my boat canvas official. He wanted to have something to do when he wasn’t working his ‘real’ job.” Linda liked the idea, and Offshore & More Custom Canvas was born.
This slideshow requires JavaScript.
When Michael isn’t at his full-time job, he pitches in on Offshore & More’s projects, including the shade panel. Good thing, too — the shade panel called for large-scale measurements that would be difficult for one person to manage. Linda gave us the details:
“The shade panel was made up of seven individual panels [and] measured 125 feet across the lower edge and 19 feet [tall] in the center.” The oversized panels required more space than Linda’s garage workshop could provide.
“Fortunately, we have a very large driveway,” she said. “I was able to place the three [center] panels on my driveway, line up the sides and mark for grommet placement. Since the top of the shade panel was arched, I had to roll part of the painted [center] panels to the side to mark and measure for the other four panels needed to complete the project.”
One panel screen-printed and ready for sewing!
After measuring and cutting the panels, Linda turned to her trusty Professional Long Arm to sew them together. Then, it was time to install the grommets — which was when having a helper became indispensable.
Due to a hand injury, Linda couldn’t use a hammer to install the incredible 650 spur grommets that the project called for. Instead, “Michael was enlisted to mark and install the grommets,” she told us. “He saved the day.”
Besides the 650 grommets, the mother-son team went through 110 yards of shade cloth and nearly 800 feet of webbing. Including a three-week screen-printing process — which required Linda to ship the giant panels to a printer on a pallet — the whole project took two months of hard work. Linda and Michael finished the shade panel in March 2021, just in time for the U.S. Open tournament the following month.
The Creativity Continues
Although the shade panel has been done for over a year, Linda still checks in on it now and again — and she feels as proud of it today as she was the day it was completed. “I love opening up a pickleball magazine and seeing the finished project in full color,” she told us.
This slideshow requires JavaScript.
In fact, that sense of accomplishment is one of the things Linda loves most about her DIY lifestyle. “I can take a simple piece of material and create something unique,” she said. “Once the project is completed, I’m left with the feeling, ‘Yes, I made that!’”
Sewing is her first love, but it isn’t Linda’s only DIY hobby. She told us she also enjoys watercolor painting and gardening. “The weather in Florida has proven to be a challenge though,” she said of gardening. “If you forget to water one day, the plants are toast!”
But remember, Linda isn’t the type to give up when things get tough. Whether it’s gardening in the Florida weather, digging up repair manuals to fix an old lawnmower or using Sailrite’s free how-to videos to learn a new sewing project, Linda embodies the go-getter spirit of a true DIYer. “I’m happy as long as I’m doing something creative,” she said.
We certainly understand that, Linda! Thank you for sharing your story — we know that your creativity and tenacity will inspire your fellow DIYers to make great things. Best of luck on all your future projects!
Who We Are
Sailrite is your one-stop DIY shop! We are a passionate crew of do-it-yourselfers who strive to equip you with the supplies and how-to knowledge you need to tackle your next project. Do you want to learn upholstery, leatherwork, canvaswork, hobby sewing, bag making or more? We have the fabric, tools, hardware, sewing machines and notions you need to master any DIY. And even if you’ve never sewn before, our tutorials and how-to videos are designed for beginners and experienced crafters alike.
What happens when an avid sailor tears his Achilles tendon and is looking at six months of recovery time? If you’re James Craig — you learn how to sew! Not letting his injury set him back, he devoted his downtime to sewing a new dodger for his 1983 Catalina 30 sailboat. With a new-to-him Ultrafeed® LSZ, plus Sailrite® materials and how-to videos, he embarked on his latest adventure. Let’s learn more about this enterprising DIYer and how Sailrite helped him successfully complete his boat projects.
James’s father was an avid sailor, and he taught his young son to sail when he was four years old. Fifty years later, he’s just as excited about the sport as he was back then. “I learned to sail in Manitoba. We then moved to Nova Scotia where we were surrounded by water. I loved it, and I kept up sailing. I got my family into sailing (sneakily) by saying it was like camping on the water.” It must have worked because James’s son has the same passion for sailing as his father and grandfather before him.
James was an engineering officer in the Canadian Navy, and his engineering skills have come in handy in his sailing life. “As an engineer, I like to figure things out. Sailing is about figuring out the wind, how to sail, when to sail, how to keep people safe, and maintaining and adding to the boat. I have learned every system on the boat with the exception of sewing, until now.”
Here James enjoys time on his sailboat.
Since James had never sewn before — and he needed to get to know his Ultrafeed — he eased into his dodger project. “My first actual sewing project was a cover for my binnacle. I wanted to test my Sailrite machine (learn how to tension, how to thread the machine, etc.) and learn how to pattern and actually sew my first project with Sunbrella® Marine Grade material.”
James also watched a variety of Sailrite project and tutorial videos to get to know his machine and practice the basics of sewing. “I went through all the ‘Learning to Sew’ videos and tried each of the things in each video: threading a machine, types of thread, zippers, piping. And yes, I made a pillow. I’m proud of that pillow, too. I then went on to the ‘Build a Dodger’ video series followed by the ‘Make Your Own Dodger’ playlist. It was so rewarding to see it come together — leather, zippers, snaps, windows, piping, seams — so many things to learn. Again, the videos were indispensable in learning each thing I was doing.”
Q. What was the motivation behind wanting to sew your own dodger?
A. As an engineer, it bugged me that I couldn’t sew. I had just lost my dad and thought it would also bring me closer to my mom, who has sewn for over 60 years but never thought to teach me. I tore my Achilles tendon and had to stay off of my feet so it seemed like a great thing to do. After learning and practicing with the binnacle cover, I then did my dodger. Wow, that was such a daunting project, but the engineer in me watched the Sailrite dodger video many, many, many times. I then patterned the dodger (it was coming to winter so was windy) on my frame. I focused on the easier panels first and then figured out how to bring it all together. Again, so many Sailrite videos were so helpful in how to do everything. I would watch a video for a few hours and sew for one hour. I have a tablet and I would play the video as a reference while I sewed. And thinking back, I actually practiced on other fabric prior to using the Sunbrella, so I almost built two dodgers. I figured that I better practice and learn using less expensive material than Sunbrella Marine Grade.
James sketched out a design for his dodger, then relied on Sailrite how-to videos to help him tackle the project.
Q. Did you run into any roadblocks or issues while working on the dodger? If so, what were they and how did you work through them?
A. Where to start. The biggest issue was assembling the panels together, especially as I was using my own design and it was different enough from the dodger design in the Sailrite video. I just put my engineering hat on and figured it out. But the video helped, too. I started sewing the easier panels and then finished with the harder ones. The entire dodger took me over 100 hours to complete (and about 200 hours of videos) but it was worth it! In hindsight, I probably should have started with my second sewing project, my sail cover, as it was easier. But I now know how to sew! Bring on more boat and home projects!
Kudos to the guidance in the videos as the hints and tips were indispensable in learning to sew and also gave great perspectives on understanding how things would go together, allowances to make (such as seams) and the tools that would make life much easier for sewing. I feel I could sit down with Eric and Matt and have a great conversation! They explained things so well and were saviors for doing something so complex, along with many other Sailrite stars in the videos.
This slideshow requires JavaScript.
Q. What did you love most about the DIY and sewing experience?
A. The biggest joy I had was having something that my mom and I could share a passion for, seeing as we didn’t have my dad around anymore — he passed away two years ago. He and I loved sailboats, woodworking and dogs. It has filled a gap between my mom and me. Additionally, I love the fact that I can sew! I think more about how something is put together, and the DIYer in me looks to see if it’s something that I could make. And DIY sewing makes one proud to show off what they put the time and effort into completing.
Here’s James sitting at a wooden table he built for his boat.
Q. What advice would you give to someone tackling their first major sewing project?
A. Break the project down into small pieces and learn how everything comes together. Don’t worry about not knowing everything; it is a learning process. Plus, you have Sailrite videos to teach you, online forums and many other resources. The outcome is SO satisfying! You will feel like you climbed your own mountain. And tackling the first project successfully will give you the confidence for doing other projects in the future.
Q. Is there anything else you’d like our readers to know about you or your DIY experiences?
A. I think it is so nice to have skills that are ageless. We live in a disposable world right now where we will spend hours buying that perfect thing. It’s so much more rewarding to create that perfect thing, with some little flaws, that only you will know about. Take a leap of faith, regardless of your age, and try something new — I never knew sewing could be so rewarding.
Thank you for sharing your story with us, James! We’re thrilled that Sailrite materials and videos were able to help you learn how to sew and conquer your first successful and impressive marine project. We can’t wait to see what you make next.
Who We Are
Sailrite is your one-stop DIY shop! We are a passionate crew of do-it-yourselfers who strive to equip you with the supplies and how-to knowledge you need to tackle your next project. Do you want to learn upholstery, leatherwork, canvaswork, hobby sewing, bag making or more? We have the fabric, tools, hardware, sewing machines and notions you need to master any DIY. And even if you’ve never sewn before, our tutorials and how-to videos are designed for beginners and experienced crafters alike.
In episodes of the classic sci-fi show Star Trek, landing parties exploring uncharted planets needed three pieces of equipment: a communicator to contact the crew still on the Enterprise starship, a phaser for defense and a multiuse device called a tricorder. Self-proclaimed Trekkie and Sailrite® customer Adrienne Killey would add one more crucial piece of equipment to that list — a Sailrite® Ultrafeed® LSZ Sewing Machine.
Adrienne purchased an Ultrafeed LSZ in early 2021. A little over a year later, she set a goal to make custom Star Trek cosplay outfits in time for a convention in early 2022 — but she had to overcome some challenges with her machine first. Luckily, her experience sewing began long before she purchased an Ultrafeed.
Adrienne started out sewing décor items and clothes on a home sewing machine that her mother gave her in 2002. Her mother’s other gift to her — the love of sewing — came during Adrienne’s childhood. She grew up seeing her mother sewing nearly every weekend. “In watching her, I learned how helpful knowing a skill like sewing could be,” Adrienne said. “Sewing gave her, and now me, an outlet for creativity.”
She has sewed a variety of projects, including clothing, a quilted wall hanging and crossbody water bottle caddies. Her home machine was fine for those projects — but when Adrienne set her sights on a more ambitious DIY, she realized she needed a more powerful machine to match.
Discovering the Ultrafeed LSZ
During the 2020 boating season, Adrienne and her family were able to spend some time on their Four Winns Vista 268 cruiser powerboat. That’s when Adrienne decided that the boat’s existing canvas enclosure needed an upgrade to fit her family’s preferences.
“A full set of canvas with Strataglass™ came with the boat. When anchored, we would hang towels from the bimini to provide shade, but that blocked the view. That was the inspiration to create new canvases on both the starboard and port sides that would provide shade, but also allow air to move through the boat.”
Knowing that her domestic sewing machine wouldn’t be able to handle marine-grade material, Adrienne and her husband began shopping for a heavy-duty machine. Their search was quick and easy. The couple had seen the Ultrafeed in several sailing videos they’d watched on YouTube — and when they did more research on the machine, they liked what they saw.
The machine’s sturdy construction and zigzag stitch capability were definite pluses. But Sailrite’s vast library of free educational content was the biggest draw for Adrienne.
“I also liked that Sailrite produces very detailed how-to videos to share sewing knowledge and advice,” Adrienne said about choosing a Sailrite machine. “The huge number of videos gave me the sense that Sailrite is not only a manufacturer of sewing machines, but they also care enough about their customers to try to give them all the information they need to have a positive project outcome.”
As it turned out, the videos became even more important as Adrienne began using her Ultrafeed.
It took some practice, but now Adrienne is a pro at sewing home projects on her Ultrafeed.
When the LSZ arrived, Adrienne tried a test project to see what the machine could do. Unfortunately, it didn’t turn out how she hoped …
“My first project on my Sailrite was a tank-style dress using cotton jersey fabric. I watched the ‘Home Sewing with a Sailrite Ultrafeed Sewing Machine’ video and read the Guidebook. When I sat down to my LSZ for the first time, I assumed I didn’t need to check or adjust the timing because the machine was brand-new directly from Sailrite, and they set the timing before sending it out the door.”
Adrienne was right that her Ultrafeed was perfectly timed. The problem was that the machine wasn’t timed for the light home fabric she picked out for her dress.
You see, Sailrite’s expert technicians tune and tension LSZ machines to sew thick marine-grade fabrics right out of the box. That’s because most people who buy an LSZ sew for their boats, and they need the machine to be ready for sailcloth, marine canvas and vinyl right away. The Ultrafeed can easily handle thinner home fabrics and thread after some adjustments — but Adrienne’s machine wasn’t adjusted yet, so she couldn’t finish the dress.
“The problems I had with that project were newbie user error and not an incompatibility of the stretchy fabric and the machine,” Adrienne said. “For the first couple of projects, I treated the machine as I would my [home sewing machine] and only adjusted the [upper thread] tension.”
It would take a few more tweaks to complete a home sewing project. But for the moment, Adrienne turned her attention to the reason she bought an Ultrafeed in the first place: the canvas enclosure for the family’s powerboat. Before getting started, Adrienne dove into the how-to videos on Sailrite’s YouTube channel.
“The videos on the Sailrite YouTube channel have been an indispensable resource for me,” she told us. “For example, when I made my canvases, I watched ‘How to Make an Enclosure Aft Curtain,’ ‘Double Sided Tape for Sewing – Seamstick Basting Tape for Canvas,’ and many others related to making canvases before I even bought the materials. I often referenced the videos throughout my project.”
The videos helped Adrienne get comfortable with the new machine, and she completed the enclosure in time for the 2021 boating season:
This slideshow requires JavaScript.
Although the Killey family is still new to boating, having purchased their Four Winns Vista in 2018, they find great joy in the hobby. “We enjoy the serenity on the water and the time to spend as a family,” Adrienne said. “When we’re on the boat, we’re exploring, swimming, relaxing, having fun and making memories. We find the time on the water to be rejuvenating.”
The family likes taking weekly dinner cruises and weekend excursions on Lake Michigan. This summer, they hope to cruise some different waterways in their home state of Wisconsin.
Voyages of the Ultrafeed LSZ
Adrienne’s success with the canvaswork gave her the confidence to try another complex DIY: cosplay costumes that she, her daughter and her dad could wear to a Star Trek convention. It would be her second attempt at a home sewing project on her Ultrafeed, and she was determined to make the most of it.
“After some initial home sewing disappointments, I learned I cannot be timid about making adjustments to my LSZ,” Adrienne said. “When I decided I wanted to create the Star Trek cosplay costumes, I deliberately used the project as a way to really get to know my LSZ and figure out how to adjust the machine correctly for home sewing. I just knew that it could handle it and my challenges in the past were user error, not the machine.”
To do that, Adrienne rewatched the Ultrafeed home sewing video, as well as a video on machine timing. She also checked the Guidebook again. Armed with this research, she tried several adjustments on her machine.
In addition to installing a #10 home sewing needle, “I also adjusted the upper tension, bobbin tension and pressure-regulating thumbscrew appropriately for light fabric and thread,” Adrienne told us. She then went above and beyond what’s required for sewing home fabric by tweaking the shuttle gib hook’s rotation and position — in other words, adjusting the machine’s timing.
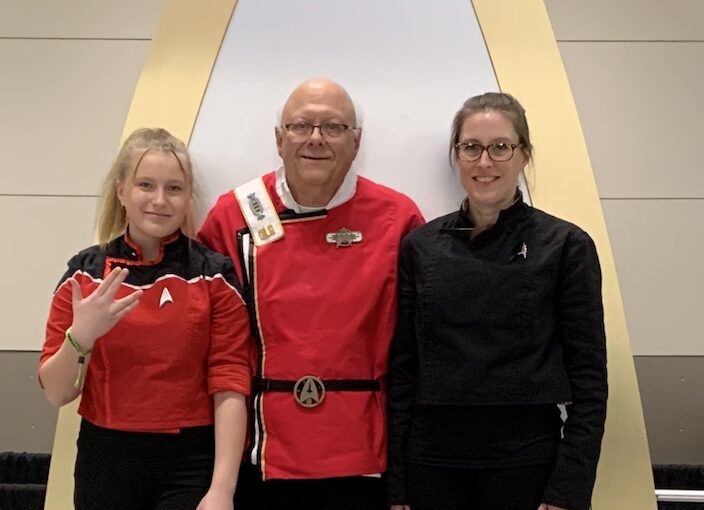
The adjustments were a complete success! Adrienne and her family had a great time showing off their finished cosplay uniforms at the Star Trek: Mission Chicago convention in April 2022.
“The uniforms came out great,” Adrienne said. We couldn’t agree more:
Adrienne’s daughter, Kayla, wore a replica of Ensign Mariner’s uniform from the new animated show, Star Trek: Lower Decks. Her dad, George, dressed in a Captain’s uniform from Star Trek: The Wrath of Khan. And Adrienne herself went in a stylized version of the uniforms worn by members of a covert organization called Section 31, which has appeared in multiple Star Trek shows and novels.
This slideshow requires JavaScript.
The Mission Continues
Now that Adrienne has boldly sewn where few have sewn before, what’s next for her? We’re happy to share that she has plans to remake a beloved backpack purse using marine vinyl from Sailrite.
Adrienne also told us that she hasn’t forgotten about the tank dress project, and she plans to take another stab at it soon. Since she first tried that project, she’s learned so much about adjusting her machine for home sewing.
“Learning how to properly master the LSZ is a journey. Making adjustments to the entire machine is necessary at the beginning of a project — and maybe even during the project.
“My journey has taught me to always have a screwdriver nearby; to not skip making timing adjustments; to be patient when dialing in the right tension and timing; and to have scrap fabric handy during the adjustment process. Taking the time in the beginning to properly adjust the LSZ for every aspect of the project will save you from seam ripping later.”
We wrapped up our interview by asking Adrienne if she had any words of wisdom for other new or prospective LSZ owners. Here’s what she said:
“I love my LSZ, and I look forward to completing more projects on it. For those considering purchasing an LSZ, it is a very versatile machine and well worth the cost. For new owners, read through the manual and watch all the videos in the ‘Sailrite Ultrafeed Set-Up, Use & Maintenance’ playliston the Sailrite YouTube channel. Also, before starting a project, search for and watch any videos on the Sailrite YouTube channel that are similar or related to the project you’re starting.”
Thank you for your kind words and thoughtful advice, Adrienne! We wish you success in all your future projects on your Ultrafeed, and we can’t wait to see what you make next. Sew on and prosper!
Who We Are
Sailrite is your one-stop DIY shop! We are a passionate crew of do-it-yourselfers who strive to equip you with the supplies and how-to knowledge you need to tackle your next project. Do you want to learn upholstery, leatherwork, canvaswork, hobby sewing, bag making or more? We have the fabric, tools, hardware, sewing machines and notions you need to master any DIY. And even if you’ve never sewn before, our tutorials and how-to videos are designed for beginners and experienced crafters alike.
The couple who DIYs together, well … does everything together! Kim and Steve Holmes have been happily married for 29 years. They own a 57-foot houseboat that is their home away from home as often as possible. In addition to the houseboat, they also have a 21-foot runabout powerboat and a Sea-Doo. The couple loves the boating lifestyle, but the Utah sun is punishing and relentless, and they were replacing their canvaswork regularly. In the beginning, they were paying a canvas shop to sew pieces for their houseboat. But Steve knew that if they invested in the Ultrafeed®, they would save considerable money by sewing their own covers, umbrellas, bimini and more. Once he convinced Kim that the machine would quickly pay for itself in canvas repair and new projects, they began tackling sewing projects for their boats. Keep reading to learn more about this industrious DIY couple.
The couple’s houseboat and runabout anchored in a scenic cove in Utah.
Kim learned to sew as a young teen participating in her local 4-H organization. She hadn’t sat down at a sewing machine since that time, so the Ultrafeed was her reentry into the world of sewing. Luckily, Sailrite was there to help. “Sailrite’s excellent videos are a huge help in planning and executing projects. We’ve also referred to Sailrite’s troubleshooting videos when working through adjustments to the machine. I’ve used the online chat for advice from Sailrite staff when I have a question.”
Their first project with the Ultrafeed was sewing new canvas wraps for the houseboat’s many deck railings. Kim and Steve reworked the existing design to make the wraps removable. “We changed the canvas from lacing onto the railings to snaps for attachment to the railings. This gave a custom look and enabled efficient removal of the canvas during the off-season, substantially extending the life of the Sunbrella® fabric. We learned as we sewed and were able to get professional-looking results.”
Here are some of the projects Kim has sewn for the couple’s boats since purchasing their Ultrafeed:
canvas railing wraps
curtains with padded valances
placemats and pillow covers (using leftover curtain fabric)
fender covers
propane tank cover
window shade screens
sling chair fabric replacements
flybridge cover
cockpit cover, aft sunshade and trailer tire covers (for the runabout)
This slideshow requires JavaScript.
Their most ambitious and largest project to date was a new bimini top. In 2020, with plenty of time on her hands, Kim set out to tackle this sewing project. The bimini top — 15 feet by 18 feet — was for their houseboat’s upper deck. Kim finished the bimini in the fall of 2020 and was thrilled with how it turned out. “Now it has a beautiful snap-on installation and fits better than any previous shade tops that we paid for in the past. It’s quick to put up and take down for the off-season.”
Though she hit a couple of snags along the way, she didn’t let that deter her from finishing: “While sewing our bimini, we got low on pacific blue thread, so we did some inside seams with green thread. We changed back to blue for the topstitching that would be visible. We came up short on the Royal Blue Tweed SeaMark® fabric, so had to patch in some leftover material from other projects. We were motivated to finish the project!”
Here’s Kim diligently sewing the bimini top. Look at all that canvas!
Here’s a bit more about the couple and their love of sewing and DIY, in their own words:
Q. What do you love about sewing and DIY?
A. We are dedicated DIYers because of the cost savings and the care and customization we can put into projects. Our current bimini shade top on the upper deck of the houseboat, which we worked on in 2020, fits better than any previous commercial version (for which we paid lots of money). With our DIY sewing skills, we create functional and good-looking fabric projects. We find that a vessel’s fabrics greatly contribute to its comfort and character. We love the quality materials available from Sailrite. We’ve worked with many fabrics — Sunbrella Marine Grade (including SeaMark with waterproof backing), Sunbrella® upholstery fabric, Phifertex®, Top Gun® and boat blanket material.
Q. How do you tackle projects as a couple? Do you do the sewing and does Steve help in other ways?
A. My husband and I work as a team on big projects. He helps plan the project and assists in feeding fabric through the Ultrafeed, an important contribution for long fabric runs. Our bimini shade top project was our largest to date. Steve handles all the snap installation with the Pres-N-Snap tool and snap fasteners. Over the years we have created many useful and attractive projects. The Ultrafeed has paid for itself over and over. We are developing skills that we hope to transfer to a sailing life in the future.
Here’s a closeup of the snap fasteners on the bimini. Using snaps makes for quick installation and removal.
We feel best around the water and enjoy waterskiing, swimming and using the water slide on the aft of our houseboat. The boating lifestyle offers the opportunity for self-reliance and the application of do-it-yourself skills. In addition to sewing projects, Steve takes on the maintenance of all our marine engines and systems. We are a nautical couple who are happiest barefoot.
Q. What advice would you offer someone who wants to try sewing and DIY for the first time?
A. For someone trying a first-time marine sewing project, if you have a “pattern” — meaning an old version of the fabric — go ahead and give it a try. We were impressed with our results. Be patient with yourself and take breaks. We often joke that there is swearing involved; it’s just part of the process. We’ve pulled out plenty of stitching along the way.
Q. Are there any valuable lessons you’ve learned making projects for your boat over the years?
A. A lesson we’ve learned is to make sure you have enough basting tape for your project. Add some to your cart as you order materials for your project. We like both the thin 1/4-inch and wider 3/8-inch tapes. Check your supplies to confirm you have enough thread, needles and fabric so you don’t come up short. Each time we put together an order, we add a couple of replacement parts for the Ultrafeed, just in case a piece rolls into the water by mistake. We travel about five hours to our houseboat, so it’s essential to have spares.
What’s next for Kim and Steve? Now that they have a new and improved bimini for their houseboat, the bulk of their boat projects are complete. They’re focusing on sprucing things up closer to home. “We’re looking at Chilewich flooring material. We’re planning on binding it and replacing some area rugs in our house. I’ve already watched the Sailrite tips video on how to bind curves on flooring material.” No matter what comes next for this intrepid couple, Sailrite will always be part of their DIY journey.
The happy couple!
Who We Are
Sailrite is your one-stop DIY shop! We are a passionate crew of do-it-yourselfers who strive to equip you with the supplies and how-to knowledge you need to tackle your next project. Do you want to learn upholstery, leatherwork, canvaswork, hobby sewing, bag making or more? We have the fabric, tools, hardware, sewing machines and notions you need to master any DIY. And even if you’ve never sewn before, our tutorials and how-to videos are designed for beginners and experienced crafters alike.
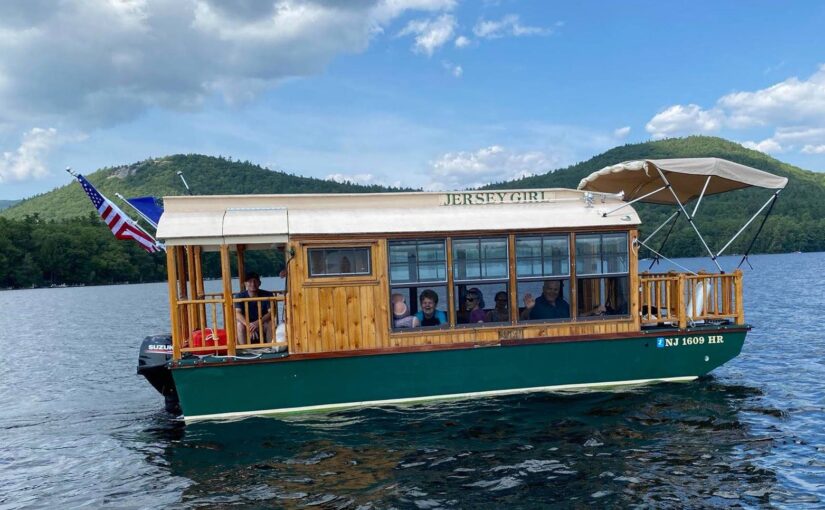
We’ve all heard the expression, “When life gives you lemons, make lemonade.” Well, that sentiment couldn’t be truer for New Jersey native and retired newspaperman Jim Norman. In 2009, Jim was unfortunately part of a round of layoffs at The New York Times, where he worked as an editor. He and his wife made the tough decision to sell their vacation home, and future retirement home, in Maine.
Jim vowed that he would somehow get a toehold in Maine again. Years later, his prediction would come true, just not in the way he originally thought. While researching the “tiny home” phenomenon in 2014, he stumbled upon the story of a man who, instead of building his dream tiny home, built a houseboat instead. Jim knew this was the path for him and a clever and inventive way to get back to Maine — or wherever he wanted to go. He knew wherever he and his wife vacationed it would be on the water. So why not live on the water? “The more I thought about it, the more it made sense. Wherever I decided to vacation with it, we would be on waterfront property. And no real estate taxes! What could be better than that?”
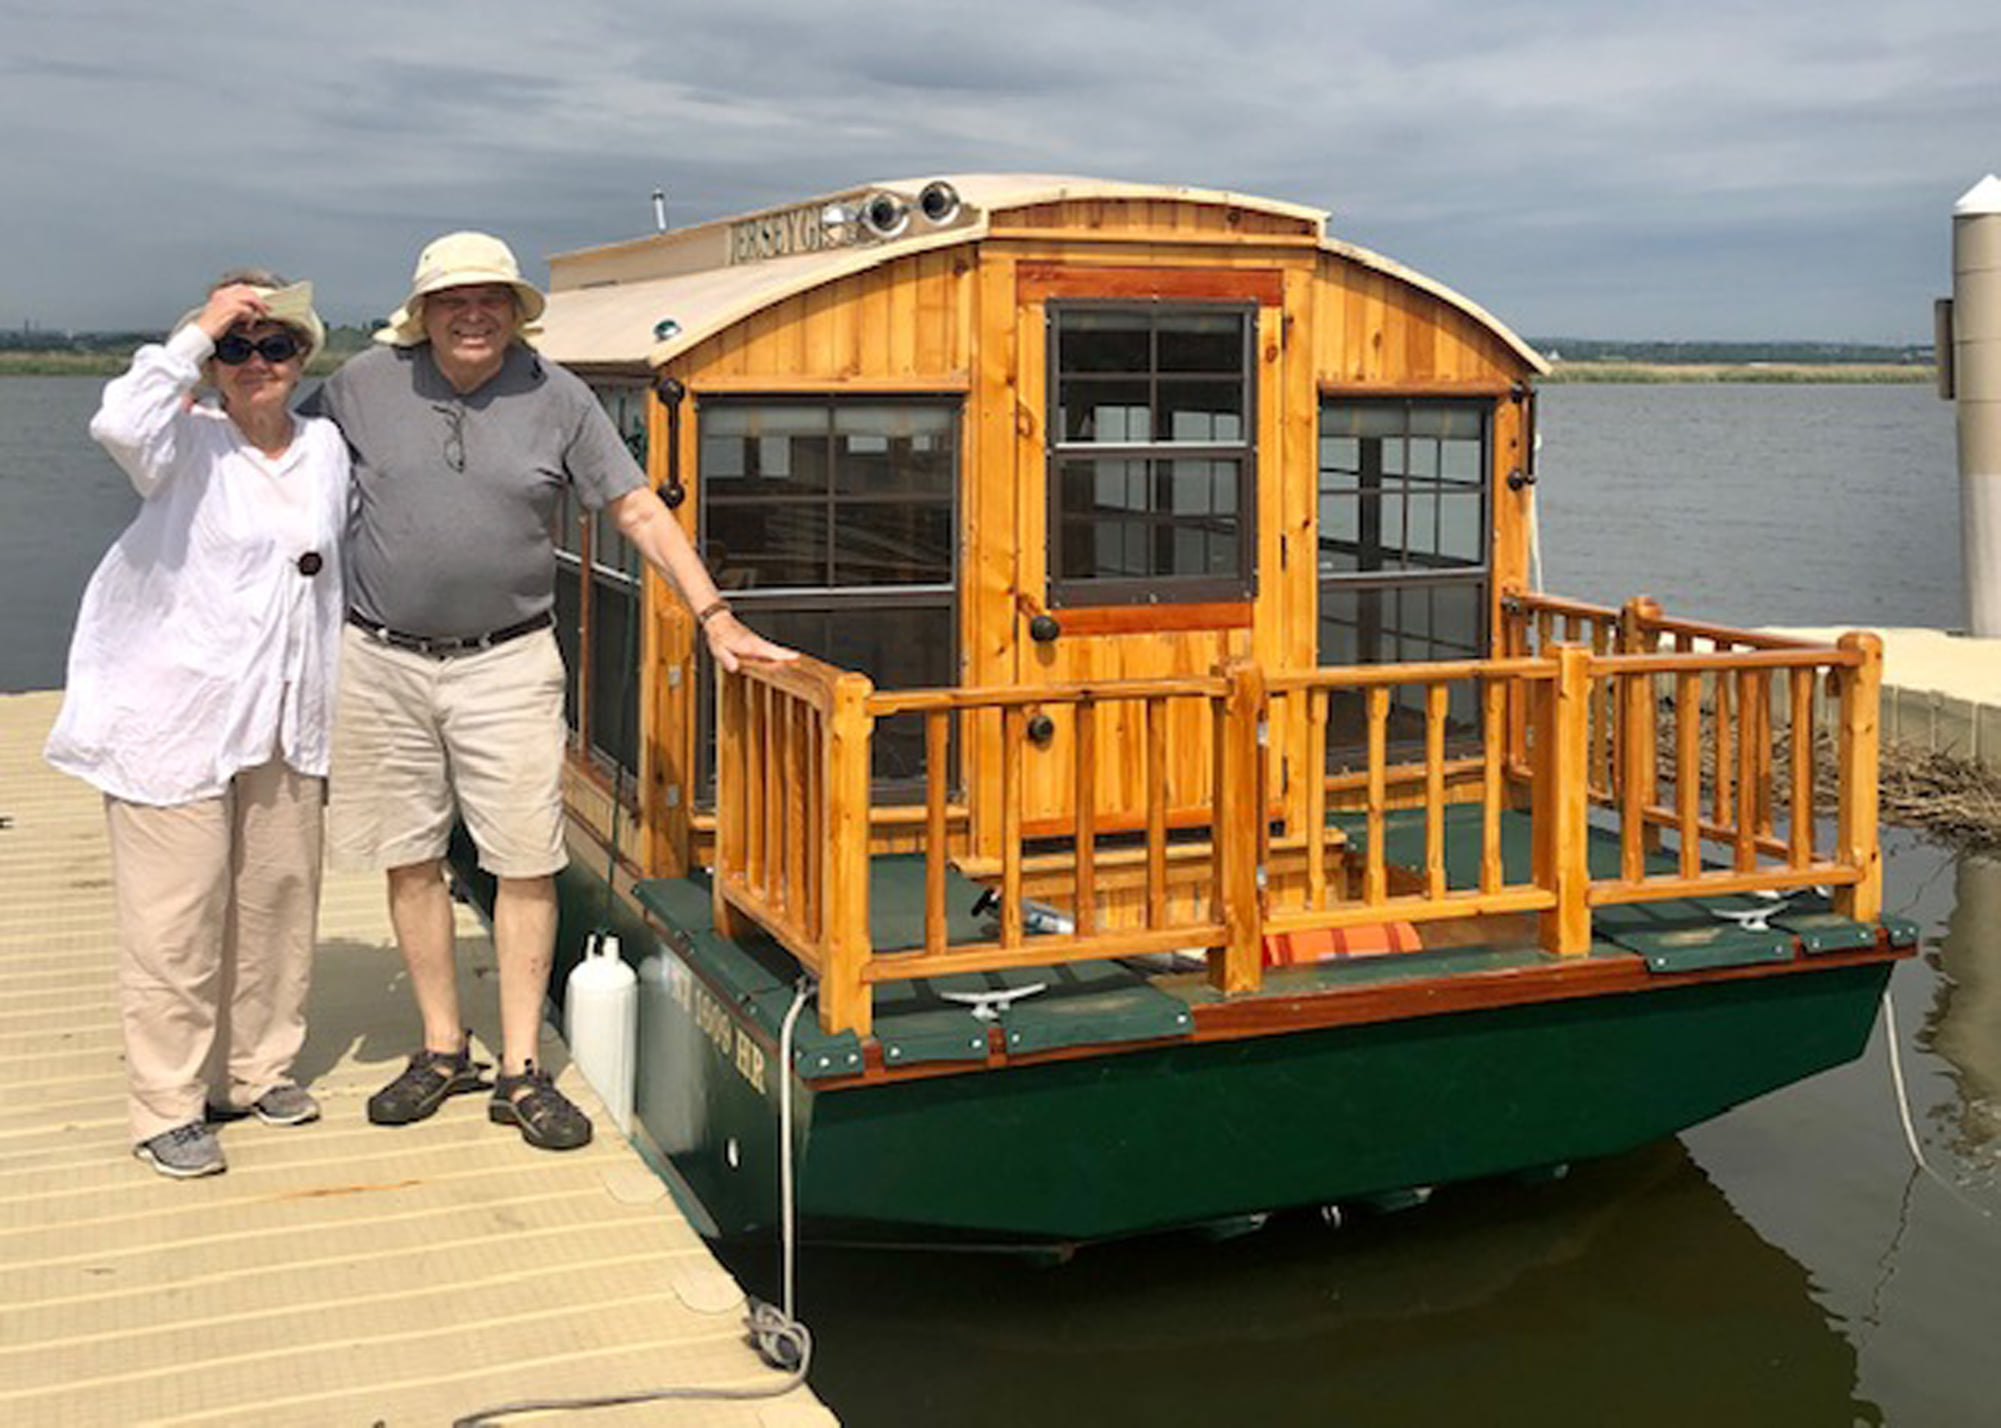
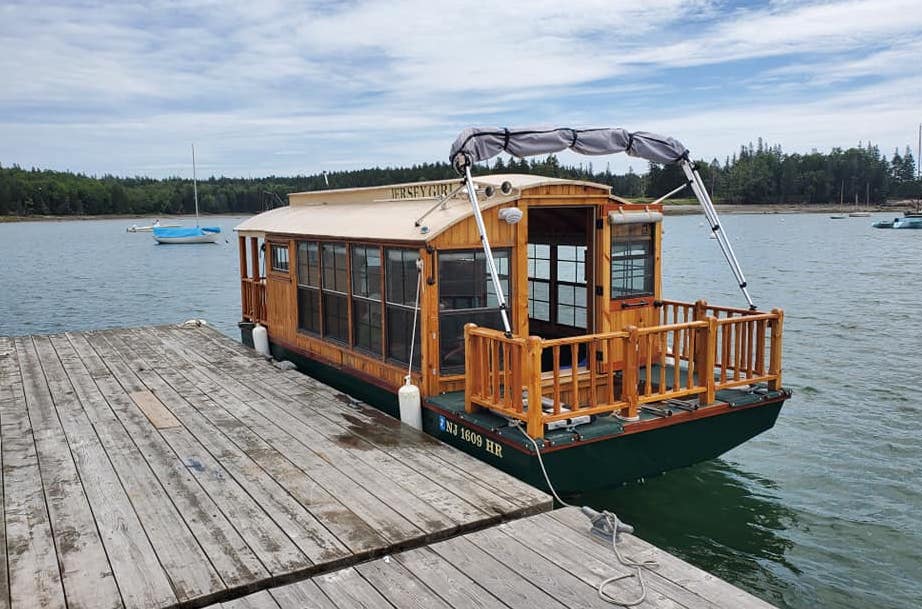
Jim and his wife, Ginger, are all smiles taking Jersey Girl out on the Hackensack River in New Jersey.
To Build a Boat
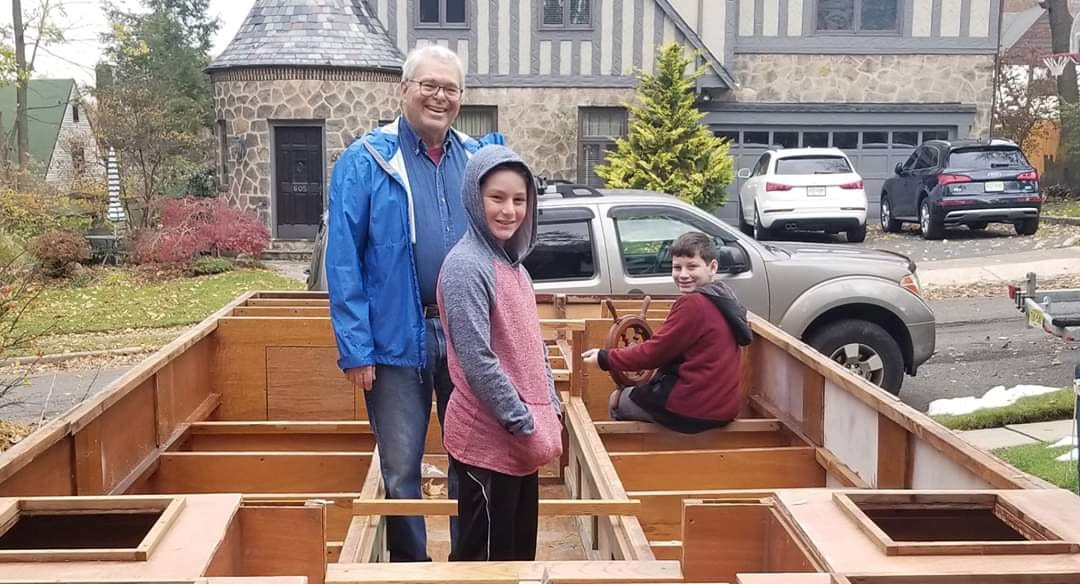
Jim contacted the designer of the “tiny houseboat” and bought a set of digital plans. In May 2015, he started building his future vacation home on the water. At first, Jim worked on the boat in his spare time, as he was still working in the newspaper industry. By the spring of 2016, he found himself looking for another editing or writing job. He came to the conclusion the next year that, at the age of 74, he was past due for a happy and well-deserved retirement. From 2017 on, Jim was able to focus on the boat with his full attention and made it his retirement project.
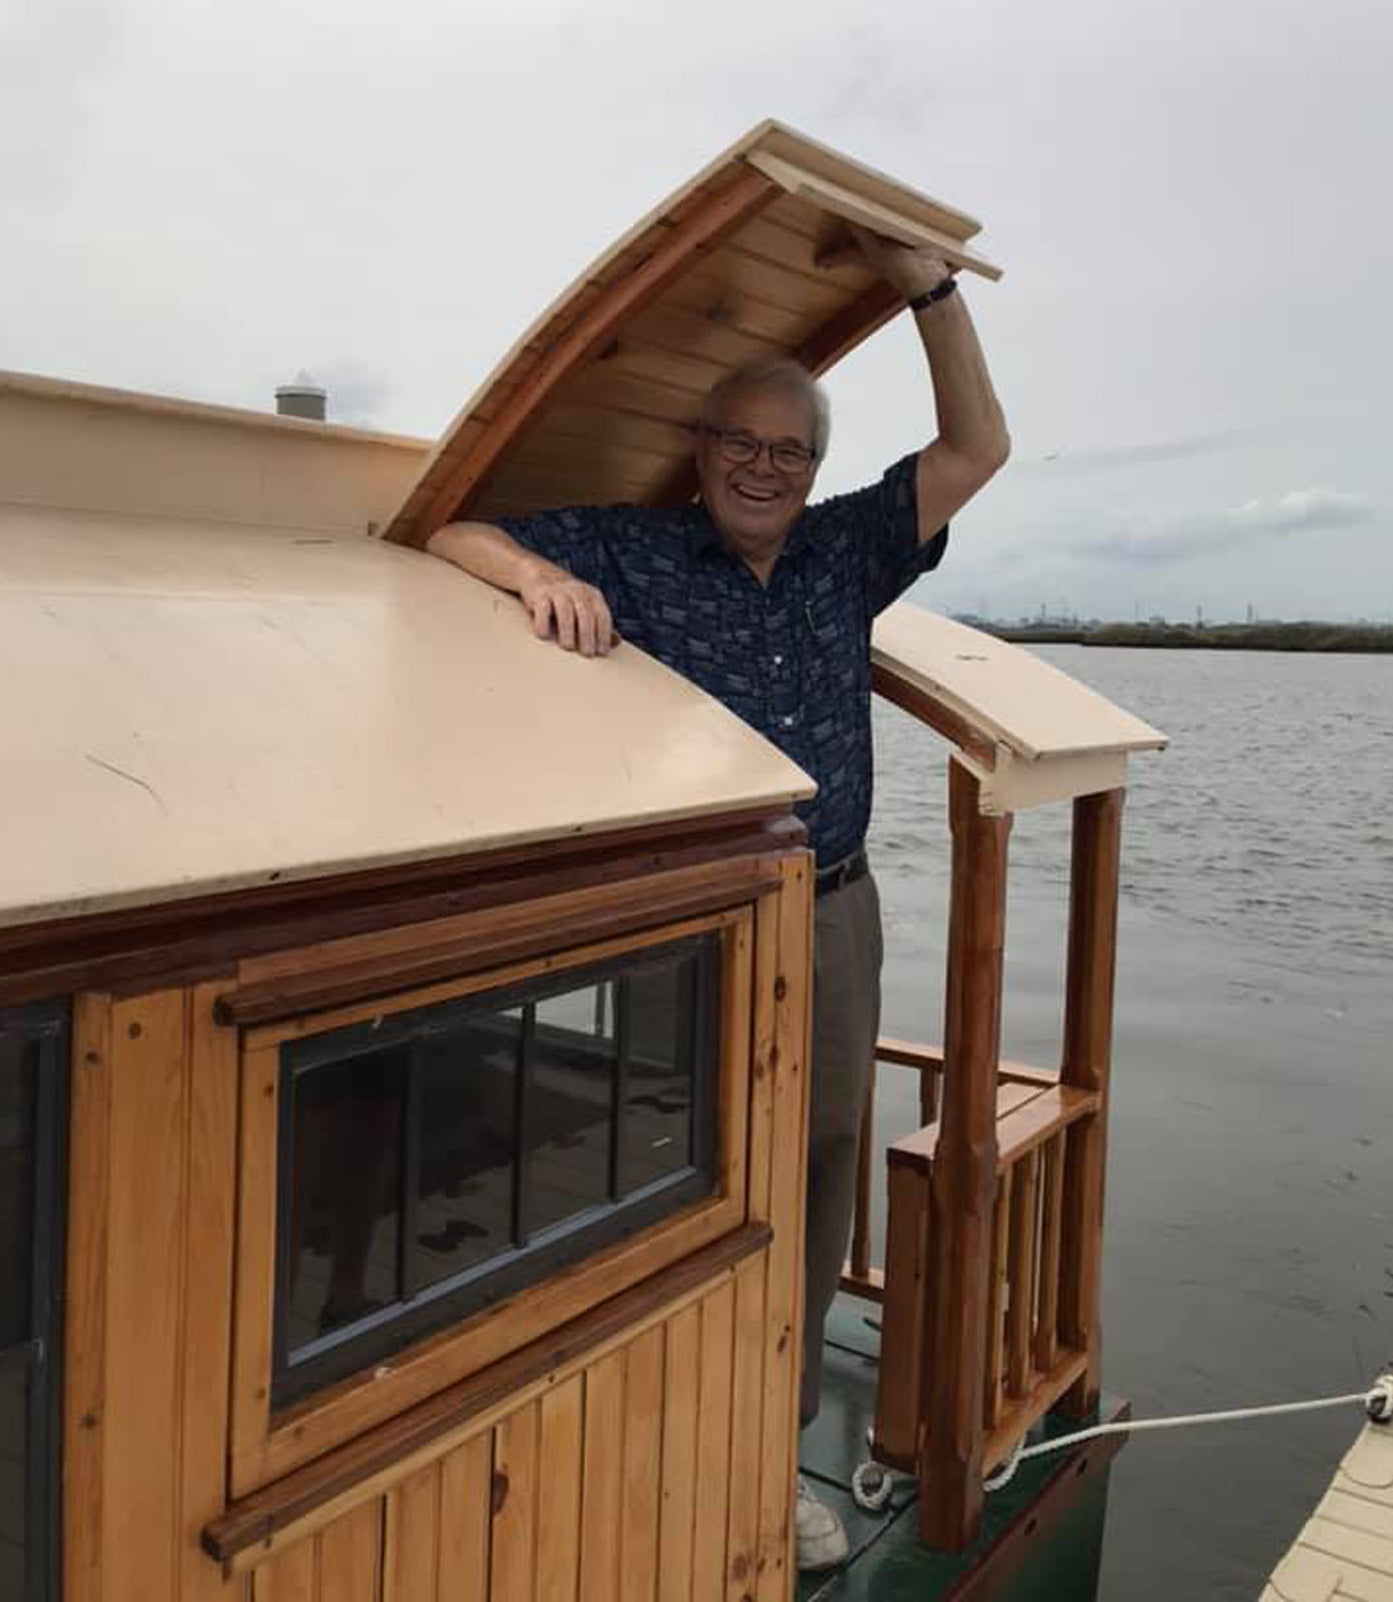
Jim built the houseboat without any assistance from professionals. But that didn’t worry him. Jersey Girl is actually the ninth boat Jim has built! “The obsession started in 1995 when I built an 11-foot sailing/rowing dinghy. … Next came two cedar-strip kayaks, followed by kid-sized plywood kayaks for three grandsons and a full-sized plywood touring kayak for me.” And just as with the dinghy, Jim modified the plans of the houseboat and made it partially his own design, adding 3 extra feet of length to the boat’s original schematics and a hinged hatch opening to make it easier to climb aboard, among other modifications.
Jim shows how the hinged roof hatch allows for easy exit and entry.
Occasionally, friends and neighborhood kids asked to help out with Jersey Girl, and Jim was always willing to let others get involved in the fun. “Several times, just for the fun of it, I held ‘work parties,’ opportunities for friends and neighbors to come and help out. On one occasion, I invited folks over for the experience of gluing and screwing a bottom panel onto the upside-down frame structure. When it was done, they all signed their names with a Sharpie pen, and those names are still there, although covered with layers of fiberglass, epoxy and paint. A couple of times, neighbors asked me if I would let their kids do something. So I outfitted them with disposable gloves and old work shirts and let them do a few swipes of paint with a roller.”
What exactly does it take to build a wooden houseboat from the hull up? Here’s a brief rundown with photos of the boat’s construction and assembly from start to finish.
This slideshow requires JavaScript.
In May of 2021, Jim launched Jersey Girl for the first time in the Hackensack River, near his home. He followed this up with outings in Lake Hopatcong, New Jersey’s largest lake, and in Maine’s Eggemoggin Reach and New Hampshire’s Squam Lake. In the six years it took to complete her, he learned a lot about building your own boat, perseverance and, most importantly, himself. We asked Jim some questions about his experience building a wooden houseboat, and all the ups and downs that come with such a daunting DIY project. He was happy to share more details about the build with us and offer his advice to anyone thinking of tackling a similar project.
Q. Is Jersey Girl for day trips or is she fit for liveaboard?
A. She’s not quite ready for overnighting, but I hope she will be by summer 2022. Plywood inserts fasten between the two settees on the port and starboard sides, and the seatback cushions are sized to exactly fill the gap to make a queen-sized bed. … Three projects planned for the spring are a slide-out shelf for a small refrigerator under the galley counter, a shower arrangement on the aft deck, and two solar panels on the roof to keep the batteries charged up when we’re not connected to shore power. So my hope is to make JG self-sufficient off-grid for a week or more at a time.
Q. How did you feel the first time you launched Jersey Girl?
A. I felt great! Because I had made so many modifications to the plan, and she wound up being almost three times her as-designed weight, I really did not know what to expect. Would I have a boat, or an interesting camper trailer? As it turned out, she not only floated, but she floated right side up, a major triumph right there. More than that, she floated exactly to where I estimated her waterline to be, with a draft of only about eight inches – meaning I can poke around in really shallow water without worry. Also, she’s incredibly well balanced, level in the water no matter where or how passengers like to sit or stand. She easily takes as many as 10 people at a time for day trips (only two for overnighters), and she’s beautifully behaved over the wakes of passing boats. I could not be more pleased.
Q. What was the inspiration behind the name?
A. Well, I’m a Jersey Boy! I grew up in New Jersey and, although I have lived and worked in many different places, I really appreciate all that New Jersey has to offer. So, the name is in honor of all the Jersey Girls, who seem to share a sassy, bossy, somewhat lovingly entitled attitude. … And by coincidence, I keep running into Jersey Girl references: There’s a diner near Lake Hopatcong called the Jersey Girl Café, and a popular local craft brewery that sells cans of Jersey Girl beer.
Two of Jim’s grandchildren visit during the winter of 2018 and give their approval.
Q. What was the hardest part of building her? Did you run into any unforeseen complications or problems? If so, how did you solve them?
A. That’s a good question! Boatbuilding is nothing BUT a serial exercise in problem-solving. And because I made so many modifications in the existing plan, and developed so many methods for doing what I wanted to do, I turned out to be an expert in creating more problems for myself. In fact, I seem to have derived what I call Jim’s First Law of boatbuilding: Every solution begets a new problem. And so on.
One of the most persistent problems during construction was how to keep rainwater from filling the unsheltered hull before fully enclosing it with the decks and cabin. No matter how tightly tarped and covered the hull was, it seemed that rain always managed to find a way in. Ultimately the answer was that water accumulation was simply unavoidable, and I just had to budget time for bailing and mopping in my construction schedule.
Because I was doing so many of the things that I did for the first time in my life, I encountered problems that I just had to sit for a while and think about – and consider the future consequences – before going on.
Q. What do you like most about the do-it-yourself lifestyle?
A. Not only is it very satisfying to do things oneself, but it makes it possible to get things just the way you like them, without having to settle for some manufacturer’s or retailer’s idea of what you need. I’ve never been frightened of DIY, no matter what the field. I’ve learned to do carpentry, boatbuilding, mechanical work, electrical work, plumbing, brazing, welding… People often ask me, “Is there anything you can’t do?” I tell them I’ve never tried my hand at brain surgery, and that’s probably a good thing.
Top: Jim made protective deck covers using Softouch® fabric. Bottom: Roll-up window shades using Top Gun® and Protect-It™ fabric.
Q. What advice would you offer to someone interested in building a boat or tackling a big project like this?
A. I guess I’d say if you have a dream for something big, don’t put it off for as long as I did. Get started on it when you’re young. And if you do put it off as long as I did, don’t listen to the naysayers, even if they are the people you love and respect. Just find a way to get started; you’ll quickly pass the point of no return and then you won’t have any choice but to finish it.
Sewing for Jersey Girl
One of the final steps of the boat’s creation was the interior finishing. This is where Sailrite came in. Jim had never sewn prior to the projects he made for Jersey Girl. But as we’ve learned so far, that wasn’t going to stop him. “I bought the least expensive consumer-grade heavy-duty sewing machine I could find, watched a couple of online videos on how to use it, bought a remnant of heavy fabric from a nearby fabric store, practiced sewing in a straight line for a half hour, and that was it! The rest, as they say, is history. It turns out I like sewing, and one of these days I’ll probably find a way to justify one of Sailrite’s machines!”
Jim purchased Sunbrella® Canvas upholstery fabric, high density foam and the Sailrite® Blade Foam Saw and made cushions for the seats and seat backs (15 in total) that will double up as the mattress for sleeping. He turned to Sailrite’s popular 30-Minute Box Corner Cushion tutorial to help him make the cushions.
Measuring, plotting and cutting foam for the cushions.
He also sewed interior roll-up window shades that also attach to the outside to protect the windows when trailering the boat. He used Top Gun for the window shades with an inner layer of a soft protective lining fabric to protect the windows during transportation on the highway. Finally, he patterned and created exterior deck covers to help prevent rainwater and spray from seeping in through the hinged hatch covers.
Watching the 30-Minute Box Corner Cushion video is what convinced Jim that he could tackle these sewing projects, even though he’d never sewn before. While using Sailrite’s Fabric Calculator to help lay out the fabric for patterning and cutting, he contacted Sailrite customer service wanting to know if Sailrite also offered a Foam Calculator. We didn’t at the time, but Sailrite has always listened to customer suggestions and ideas. We now offer a Foam Calculator that shows DIYers how to nest foam pieces to get the most usage out of their foam sheet and to help save money.
The finished cabin interior. We think Jim did a fantastic job on the box corner cushions!
What’s Next for Jim & Jersey Girl?
Now that Jersey Girl is finished (mostly!), Jim is ready to get her on the water and enjoy his six years of hard work and determination. But that doesn’t mean he’s ready to slow down. Even though the bulk of his work on Jersey Girl is done, he’s not planning on slipping into a life of inactivity in front of the TV. “Now that I am retired, with all of my other interests, I often wonder where I ever found the time to work for a living. If you ever see Jersey Girl on a waterway near you, be sure to stop me to say hello!”
Jim will turn 80 in May 2022, and he says he’s probably through with big building projects. Instead, he’s putting his hands to work on a new venture — writing a book. The book will chronicle his adventure building Jersey Girl and all that came with the experience. “Now that most of the work is done, the chronicle will also be about the places we travel together, the things we see, and the people we meet along the way.” Jim plans on taking Jersey Girl up the Hudson River and possibly to Canada for a rendezvous with other boatbuilders, painting and photographing what he sees along the way, two other passions of his.
And even though Jersey Girl’s sewing projects are complete, Jim isn’t putting his sewing machine away anytime soon. He has plans to redo his patio furniture cushions that have seen better days. He also has an idea for a line of educational plush toys for children.
If you’d like to learn more about Jersey Girl and follow Jim’s adventures on the water, you can follow his Facebook page: Jersey Girl the Houseboat.
Who We Are
Sailrite is your one-stop DIY shop! We are a passionate crew of do-it-yourselfers who strive to equip you with the supplies and how-to knowledge you need to tackle your next project. Do you want to learn upholstery, leatherwork, canvaswork, hobby sewing, bag making or more? We have the fabric, tools, hardware, sewing machines and notions you need to master any DIY. And even if you’ve never sewn before, our tutorials and how-to videos are designed for beginners and experienced crafters alike.
Dianne Smock learned to sew at a young age but never considered herself an experienced sewist. That is, until she tackled the project of a lifetime — a winter sailboat cover for her Bayfield 32, named Tilgata. For such a large-scale and heavy-duty project, she needed something tougher than her home sewing machine. There was no question about which machine to choose. Dianne purchased the Sailrite® Ultrafeed® LSZ, and the boat cover was the first project she made with it. In addition to the Ultrafeed, she also utilized Sailrite how-to content and the guidance and advice of our customer support staff to design and craft her massive, three-section winter cover.
The original cover that came with the boat was in rough shape and poorly designed. The massive cover was one piece and weighed about 60 pounds. The cover was assembled on a frame consisting of metal poles that snapped together across the hull. “It took half a day just to assemble the frame. Hauling the cover up and over the frame was a two-person job (or more). The hook-and-loop fasteners had long ago lost their ‘stickiness.’ In addition, it had been modified to fit the boat without the mast; we had to cut it to fit around the mast and then fill the gap with tarps.” Not only was the cover difficult to manage, it did not adequately protect the boat’s interior during harsh winter weather.
Even though Dianne bought the Ultrafeed LSZ specifically for sewing the boat cover, she wasn’t going to let a machine like that go to waste! After she tackled the massive sailboat cover, she stitched up a grill cover, replaced her dodger windows with new Strataglass™ window material, and made slipcovers for her living room chairs.
This slideshow requires JavaScript.
Keep reading to learn more about Dianne’s story and how she conquered the DIY of a lifetime with her new Ultrafeed, Sailrite how-to videos and help from the Sailrite customer support team.
Q. Can you tell me about the design process of creating your winter sailboat cover?
A. My main objective was to create something that my husband, Randy Anderson, and I could put on and take off by ourselves, so weight was a big deal. I started out with a five-piece design that evolved to the current three pieces, each of which weighs around 10 pounds. I worked it out on paper and sent the design to Sailrite for confirmation that it would work and that I had measured the fabric correctly. We turned our living/dining room into a factory and my husband made a production line to help with the long seams. The pieces zip together; the zippers are hidden under flaps that ensure weatherproof closure. All told there are 41 yards of fabric, eight zippers ranging from 16-96 inches, and the 20+ collars and boots are fastened with hook-and-loop closures. We finished it in October 2020 and Tilgata made it through the harsh northern Michigan winter clean and dry.
This slideshow requires JavaScript.
Q. Why did you choose the Ultrafeed for your boat cover project?
A. Randy has known about Sailrite for years and subscribed to your catalog many years ago. We even still have a 1992 catalog! He had envisioned making his own sails at one time long ago. He bought what he thought was a “heavy duty” machine (not from Sailrite) but, as often happens, other priorities came about and the machine was stored in our basement unopened for nearly 20 years. When I decided to make a new cover, we got the machine out, and I saw immediately that it was not truly heavy duty, so we decided to do it right this time and get a Sailrite machine. I chose the Ultrafeed LSZ because I knew enough about sewing to know that I would someday need the zigzag feature, and I liked the package of accessories. I like that it can be used for regular sewing jobs as well as big jobs. I don’t think Randy will tackle sailmaking in the future, but he will likely try out the Ultrafeed on some leather projects.
Blast from the past! Randy’s copy of the 1992 Sailrite Catalog.
Q. You watched our Winter Sailboat Cover video as well as contacted Sailrite customer service with questions. Can you tell me a bit about what your experience was like working back and forth with our customer service team?
A. I must have watched portions of that video a dozen times! Whenever I got stuck on how to do something, I went back and watched the relevant section until I could replicate it. I developed several versions of the cover design before sending it to your customer service folks for confirmation that the cover would work with the fabric I had selected. I asked dozens of questions and got prompt responses from Bill Becker in Customer Support. Probably the most difficult part of the project for me was figuring out where to cut the slits for the stanchions, stays and shrouds. I was afraid I would ruin the whole thing if I made a mistake. Bill was very reassuring that it didn’t have to be perfect, and he was right — the collar and boot configuration was actually quite forgiving and left some “wiggle room” for an imperfect slit.
Q. How did you feel after you finally completed the cover and you put it on the boat the first time?
A. Relief! It fit! We made a couple of trips last winter to the boat just to make sure everything was intact. When we opened it up this spring, we found a clean and dry deck, which made me very happy. And putting it on this fall was a pleasure — it went on very quickly and easily.
This slideshow requires JavaScript.
Q. What do you love about being on the water and the sailing lifestyle?
A. First and foremost, we love the majesty of the water and its endless challenges. Nothing beats the moment when the engine is turned off, and the wind fills the sails and propels us — often without care of where we are going — just the enjoyment of the movement. Second, we love the people we have met. Marinas are filled with interesting people and fascinating stories, and we have made friends with wonderful folks from all over.
Q. Where do you launch your boat? Do you do day sails or weekends?
A. Although we live in the Detroit area, we keep our boat in Cheboygan, Michigan, which is 15 miles east of the Straits of Mackinac on Lake Huron. There are many interesting ports and sailing options in the northern Great Lakes. I consider the boat my “up north” cottage; we spend as much time on the boat in the summers as our schedules allow. We do mostly day sails; our trips are usually just two to five days, although we would like to do longer trips … maybe next year.
Q. What do you love or relate to about the DIY lifestyle?
A. I have always been a “doer,” needing to be busy. For many years while I was working and raising kids, I didn’t have much time to devote to projects, although my husband and I have remodeled three houses, doing much of the work ourselves. Since retiring I have looked for new things to do. I have started refinishing old furniture, crocheting, baking and sewing. I’m currently working on restoring a century-old treadle sewing machine that belonged to Randy’s great-grandmother. I like the satisfaction of completing a task — although that feeling doesn’t last long, so I’m off to the next thing!
Dianne and Randy are all smiles after installing the new cover system. What an accomplishment!
What sewing projects are on the horizon for Dianne? This upcoming winter season she’ll be sewing new cockpit cushions for Tilgata. With the Ultrafeed LSZ by her side and her newfound confidence in her sewing skills, we know she’ll tackle the job like a pro.
Who We Are
Sailrite is your one-stop DIY shop! We are a passionate crew of do-it-yourselfers who strive to equip you with the supplies and how-to knowledge you need to tackle your next project. Do you want to learn upholstery, leatherwork, canvaswork, hobby sewing, bag making or more? We have the fabric, tools, hardware, sewing machines and notions you need to master any DIY. And even if you’ve never sewn before, our tutorials and how-to videos are designed for beginners and experienced crafters alike.